Welcome!
Chime Design and Build
By: Lee Hite
Right Click to Translate
We provide you with easy options for making good decisions when designing and building tubular-bell wind chimes from tubes, pipes, or rods. You can build a chime set using the plans detailed below or you can design a chime set specific to your personality, style, and budget.
| DESIGN | |
| Tubes-Pipes-Rods | Build Plan |
| Resources | |
| NOTES OR CHORDS | |
| Note Selection | Distance Caution |
| Emulation | Building Big |
| METAL | |
| Metal Selection | Quality Caution |
| LENGTH | |
| Precalculated | Calculators |
| Angle Cut | |
| TUNING | |
| Tuning | Frequency |
| CHIME SUPPORT | |
| Support | Suggestions |
| Support Line | Disk/Hoop/Ring |
| Calculator | |
| STRIKER/CLAPPER | |
| Strike Zone | Shape & Weight |
| Suggestions | |
| Wind SAIL | |
| Wind Sail | No Dingdong |
| Orthogonal Sail | Windless Chimes |
| Tank Chimes | Decorating |
| SCIENCE OF CHIMES | |
| The Science | Tubular Bells |
| Loudness |
Proportional Dimensions |
| Strike Note | Overtones |
|
Missing Fundamental |
Bell-Like |
| Calculations | |
| REFERENCES | |
| Conclusions | Visitor Projects |
| Links & Sources | FAQ's |
A variety of best practices, patterns and calculators are provided to accommodate your skill level and construction resources. Avoid the common mistakes often found in commercial chimes and you can easily construct a great sounding set of tubular bell chimes.
If you know what you want and just need dimensions and patterns, see Quick-Start below.
If you're curious about some of the design considerations, read on.
To help simplify your visit, the menu has been organized specific to each section of the chime set design. You can anticipate just a few decisions before you�re ready to begin construction.
There is a lot of information here and in the design handbook, but don't let it overwhelm you! Most of the information provides choices for making good design decisions.
You can build your first set using the DIY plans below.
See creative chime projects by site visitors!
 Download theses helpful plans and patterns.


Design of the Month
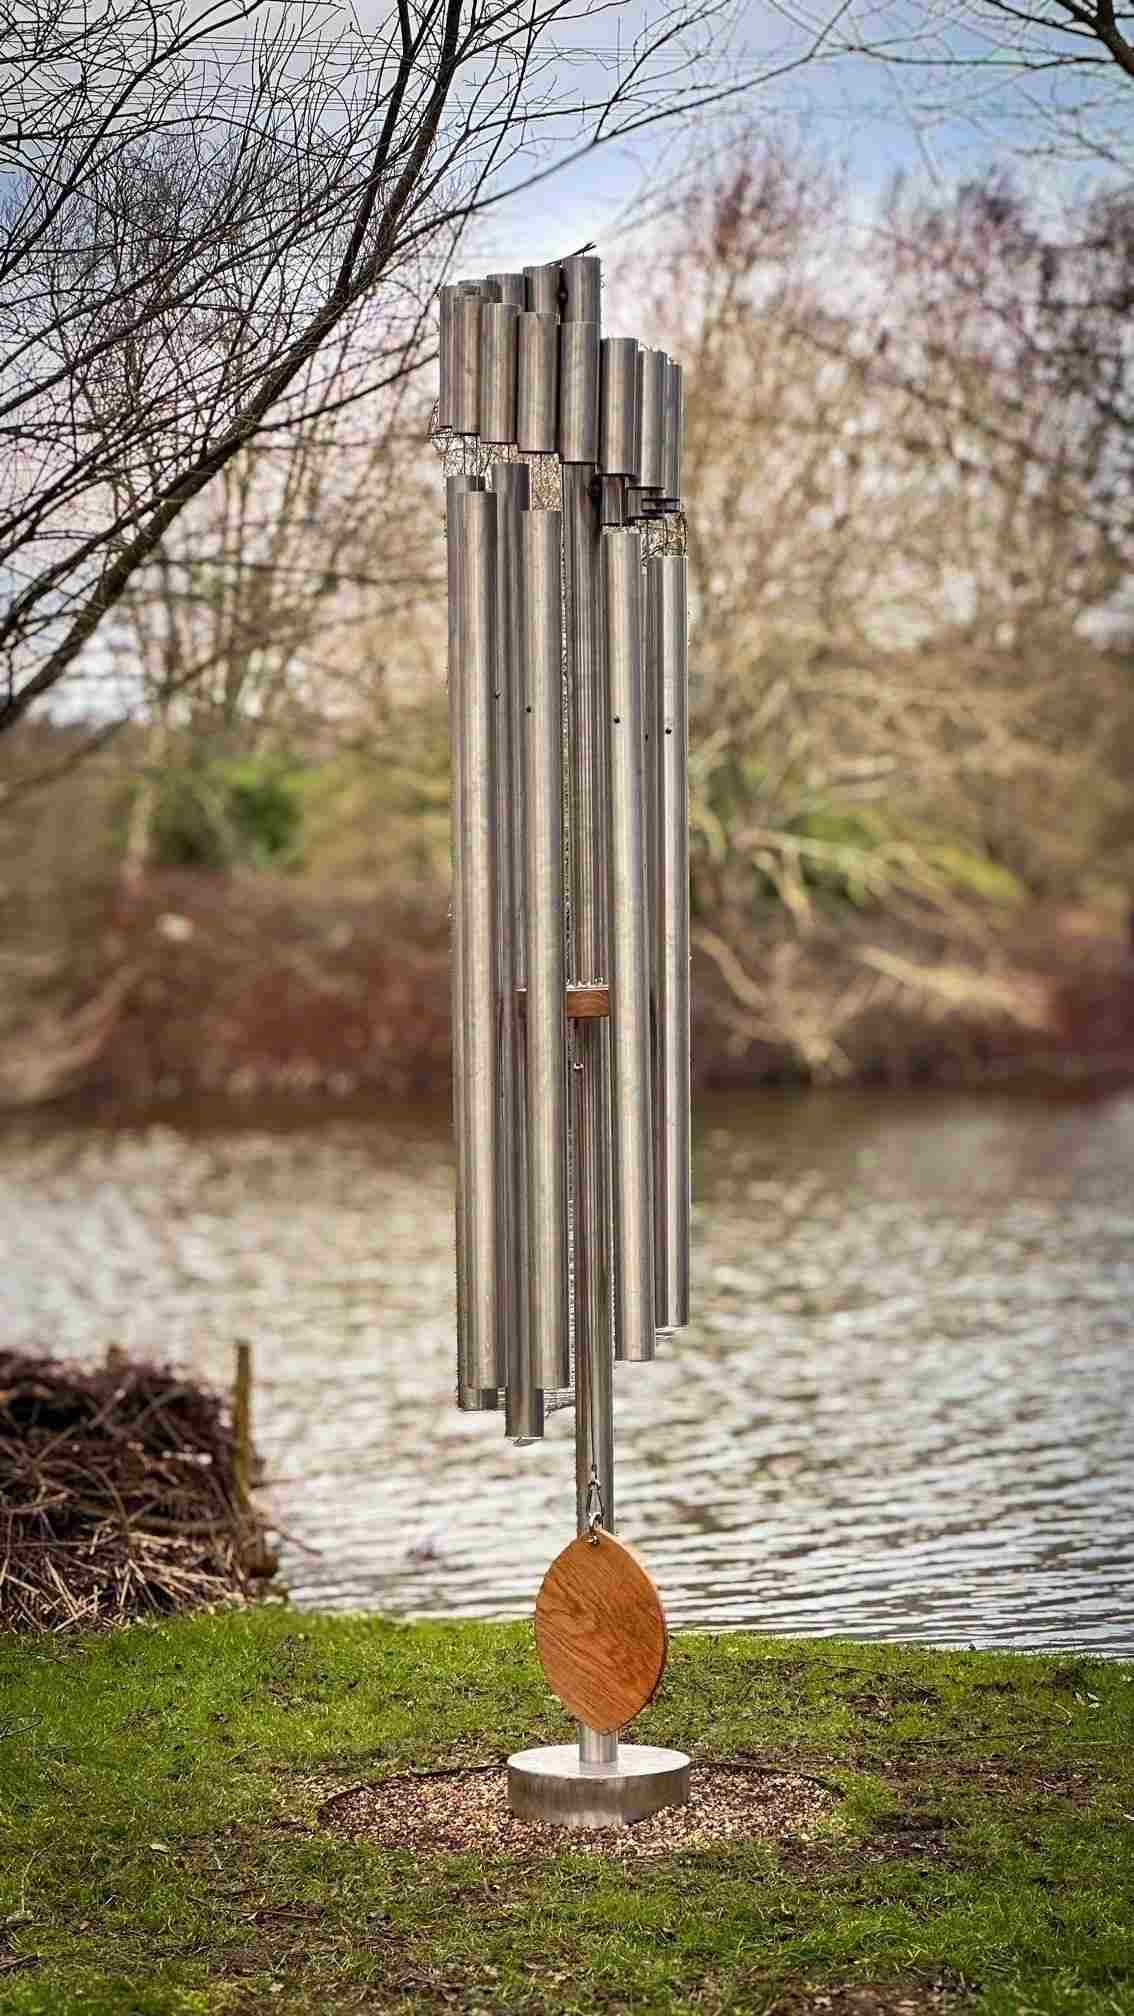
Sculptures by the Lakes by: Simon Gudgeon from the UK
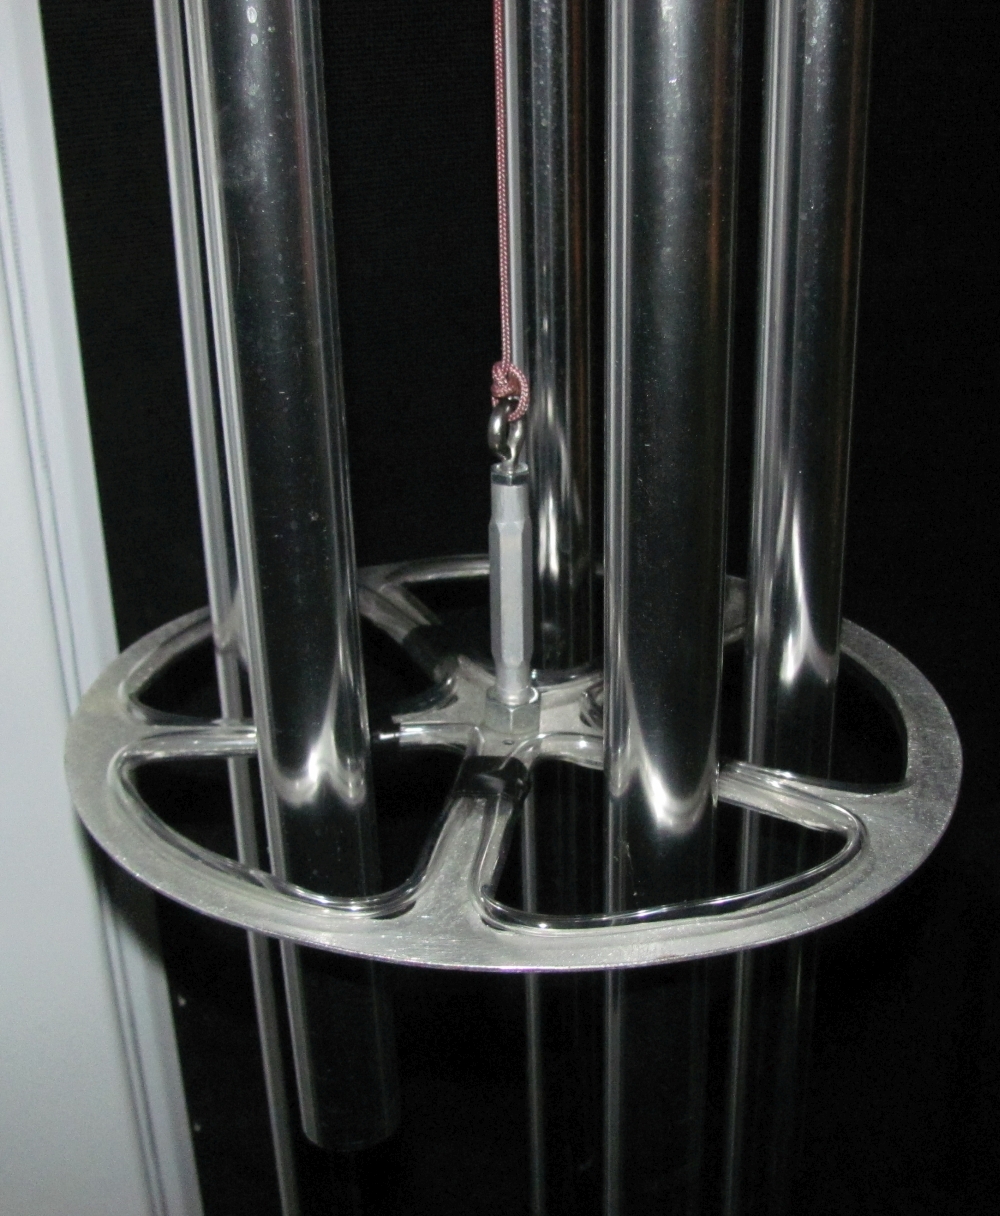
Simon designed a beautiful monumental wind chime using 76.2mm (3inch) stainless tube with a 3.2mm (0.12598 inch) wall. The design combines sound with kinetics and is held together by tensegrity. It�s installed at Sculpture by the Lakes, my sculpture park in Dorset UK.
www.simongudgeon.com
www.sculpturebythelakes.co.uk


Previous Designs

------------------------------------------------
How To Make
Tubular Bell Wind Chimes (Step by Step)
<Quick Start>
DIY Plans, Videos, Files and How to Handbook
Tubular Bell Chimes Design Handbook
5.2 Meg, PDF The Handbook duplicates
the website. Take it with you as a reference
when you build the chime set, also included
in the combo pack below.
Chime Build Combo Pack Zip, 12 Meg, Includes the Handbook, 13-calculators, support disk patterns, sail patterns and chime emulation software.
How to Build Wind Chimes � DIY Plans 1.5 Meg, PDF, A great sounding set of wind chimes can be built for about $40 depending on the chime set size you select. Choose from four height selections ranging from 36 to 75 inches (900-1900 mm). Add your creative touch by altering the material and style used for the top support disk, striker and wind sail.
 DIY Happy Birthday - Chime Set
1.5 Meg, PDF, Surprise that
special person or occasion with a song played on a set of chimes
you've built. For about $30, materials are available from your
local home improvement store. Keep the chime set for the next
party/occasion or convert them into a set of hanging wind
chimes. See YouTube example
here by Keith Fields
DIY Happy Birthday - Chime Set
1.5 Meg, PDF, Surprise that
special person or occasion with a song played on a set of chimes
you've built. For about $30, materials are available from your
local home improvement store. Keep the chime set for the next
party/occasion or convert them into a set of hanging wind
chimes. See YouTube example
here by Keith Fields
How to make wind chimes video using information from this website by Steve Ramsey at Woodworking for Mere Mortals.

Chime Length Calculators
(Tubes
and
Rods � Inches or Millimeters)
Note:
Each calculator has 10
sheets total, 2 calculators and 8 information sheets in a single
download.
The calculators require one of the following programs to view and execute:
For PC's, MS Excel TM![]() Viewer
Download it Here (Zip file)
Viewer
Download it Here (Zip file)
Excel Reader on Google Play
For the iPhone Docs To Go in the Apple store
Calculators are for: Aluminum, Brass, Copper, Cast Iron, Steel (EMT), Stainless Steel and Titanium
All Musical Notes DIY Chime
Tube Calculator (A4=440)
(Zip)
(Most common)
Inches Version
Millimeters Version
(Use this to select notes
for base A4= 440Hz)
MS Excel TM
C9 Chord Chime Tube
Calculator Zip, CEGBbD
(Great for
wind chimes)
Inches
Version
Millimeters Version
Pentatonic Scale Chime Tube
Calculator
Zip
CDEGA
Inches Version
Millimeters Version
Westminster Scale Chime Tube Calculator, Zip
B3-E4-F#4-G#4
Inches Version
Millimeters Version
All Musical Notes DIY Chime
Rod Calculator
Zip
Inches Version
Millimeters Version
Support Disk Calculator Zip, 220K
Pre Calculated
Pre-calculated Chime Tube Dimensions
(A4=440, 75 choices, PDF)
Pre-calculated Chime Rod
Dimensions
(90 choices, PDF)
Special Music
Scales
(A4=432) All Musical
Notes DIY Chime Tube Calculator (Zip)
Inches Version
Millimeters Version
(Use this to select notes
for base A4=432Hz)
(A4=444) All Musical
Notes DIY Chime Tube Calculator (Zip)
Inches Version
Millimeters Version
(Use this to select notes
for base A4=444Hz)
Support, Striker
and Sail
Patterns
Wind Chime
Support Disk and Striker Patterns 5.8Meg PDF,
includes location markers for single point or dual point chime
hang, 3-point or 4-point support disk hang, tube sizes from 1/2
inch
to 2 inch, size for both a circular and a star striker, and
generic patterns.
Wind Sail/Catcher Patterns 1.3 Meg, PDF
Chime Support Suggestions Single point or dual point for a soft or rigid mount.
Striker Design Suggestions Includes traditional and non-traditional strikers.
Wind Chime Emulation Software Zip, 105 Kb Syntrillium program from 1996
Wind Chime Designer Software
by Greg Phillips.
A well designed freeware called
Wind Chime Designer V2.0,
1997-2006-2020, will emulate a chime for notes between A2 (110
Hz) thru B8 (7,902 Hz) in 82 different scales. It will help you
determine what notes sound pleasant on a chime and what scale to use.
Instructions HERE
Remember -the loudspeaker connected to your computer has the ability to produce the low notes from C2 to C4 but a chime may not radiate those sounds.
DIY Calculator includes the following features:
Calculates length and hang point for tubes or rods unrestricted at both ends.
> A ratio calculator to predict chime length from a known chime dimension and
frequency.
> Look-up tables for standard size tubing
> Look-up table for material properties
> Standard Music Scale
> All dimensions calculated are based on OD, ID in inches or mm and specific material
types.
> OD = outside dimension of tubing (inches or mm), ID = inside dimension of tubing
(inches or mm)
> Material type = aluminum, brass, cast iron, copper, steel (EMT thin-wall conduit),
stainless steel, titanium
> Note selection by frequency in Hz
> The calculator uses nominal values for material properties.
However, if you
know the exact material density and elasticity, you can enter those parameters.
> Read about cautions
here
Caution-> these values allow you to get close to the desired note (typically within 1%) but if you desire an exact note, cut slightly long and grind to the final length, but not usually required for wind chimes. Manufacturing dimensional tolerances may cause slight inaccuracies in the actual results, not to mention the effects of poor material handling along with slight variations in material properties and impurities. If in doubt, cut slightly long and grind to final values. You can measure some of the frequencies (not all) for note verification using software programs listed here.
Must Read Caution-> Do not use these calculations for an orchestra or a musical setting unless you are certain they use A=440 Hz. An orchestra or symphony may brighten slightly and will typically tune for A=442, 43 or 44 The above chart uses A = 440 Hz. Most symphony grade instruments are shipped with A=442 Hz. While orchestra grade chimes typically do not go below the C5 octave, they are not tuned for the fundamental frequency, which is the basis for all the calculators on this website. Instead, they tune for the overtones and depend on the brain's fuzzy logic to perceive the correct note. An orchestra chime that is tuned for C5 will typically be cut for a length around C2 and then hand tuned to become a perceived note of C5.
![]() Chime
calculator cell phone app by site visitor Andrew Hughes,
Android Version
Chime
calculator cell phone app by site visitor Andrew Hughes,
Android Version
Online chime calculator
by site visitor
Larry
Snyder
- Suggests a 'cut list' and cost estimate for
the number of raw tubes to be purchased.
- Offers a Support Disk pattern based on the number of chimes
desired.
- Allows for selecting various frequencies of "A4."
- Presents the Solfeggio "Healing" Frequencies.
- Has macros for auto-selection of Major and Natural Minor
scales.
- Shows only the 'interesting stuff' when printed.
Tubes, Pipes or
RodsWhat's the difference between a pipe and a tube; the way it�s measured and the way is is applied for use. Pipes are passageways while tubes are for structural builds like hand railing, bicycles and lawn chairs. For the purpose of tubular bell chimes we consider them the same. The important parameters are the outside diameter, the inside diameter and the type of metal.
On the other hand, a rod is a solid metal cylinder that can produce a very different sound compared to a tube. The DIY calculators on this website can predict the resonant frequency for a tube or a circular rod and their hang point location. If you want to design and build a chime set using rods rather than tubes all you have to do is set the inside diameter to zero and enter the outside diameter and type of metal into the DIY calculator.
If you are trying to decide between using a tube or a rod as the chime element, one important difference is the sustain time of the musical note. Typically a rod will have a much longer sustain time and in some environments this maybe desirable but annoying in others.
Another difference between tubes and rods is their length for a given note. A rod is shorter than a tube to strike the same note for the same metal. For example, a 1 inch steel rod for middle C, (C4) is 26 1/4 inch while it is 32 7/8 inch for a 1 inch steel EMT tube. In addition to smooth surface metal rods, I have tested steel rebar and the sound was awesome. Because of the hardness, rebar exhibited a wonderful sustain time which helped to hold on to the overtones. I did not test the accuracy of the DIY calculator but I suspect it will be close. I would suggest selecting your notes based on steel, and while the notes probably will not be completely accurate, the ratio among the notes should remain the same.
Two additional issues to consider are the weight and loudness difference. Rods typically have a relative small diameter offering a smaller radiating surface producing a quieter chime, but on occasion the longer sustain time can offset the reduced loudness and sound quite acceptable.
1. Select the number of chimes (typically 3 to 10) for your set and the musical notes. It is helpful to understand the limitations for effective note selection as discussed in the section on the bell-like chime. Keep in mind the physical size for the set. Whether you use pre-calculated dimensions or a DIY calculator, observe the length for the longest chime as a guide for overall size. Remember to include extra length for the wind sail that hangs below the chimes. Read this caution.
2. Select the metal for the chime tube. See the metals comparison in the video for How to Make Tubular Bell Wind Chime
3. Cut each chime to the length provided by the pre-calculated table or the DIY calculator. Best to cut slightly long (about 1/8�) to allow for smoothing and de-burring the ends to final dimensions.

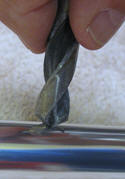
 If
you're new to cutting metal and looking for an easy method, I use an
abrasive metal cutting saw blade in a radial arm saw and it works equally
well with a cut-off saw aka chop-saw. The blade pictured right is under
$5.00 at Home Depot. Make certain to use a cutting disk designed for
the type of metal you plan to use. Using the wrong type of abrasive disk can
cause a dangerous explosion The traditional tubing cutter or hacksaw
also works well.
If
you're new to cutting metal and looking for an easy method, I use an
abrasive metal cutting saw blade in a radial arm saw and it works equally
well with a cut-off saw aka chop-saw. The blade pictured right is under
$5.00 at Home Depot. Make certain to use a cutting disk designed for
the type of metal you plan to use. Using the wrong type of abrasive disk can
cause a dangerous explosion The traditional tubing cutter or hacksaw
also works well.
4. Smooth the ends to remove sharp edges and to provide a professional appearance. Place an old towel or cloth on a table to protect the chime from scratches. Roll the chime back and forth as you file or sand the ends smooth. Slightly chamfer or round the outer edge.
5. Drill the support holes at the hang-point location provided by the pre-calculated table or the DIY calculator.
 Using
a V-block, center the block before drilling by lowering the drill bit to
the bottom of the vee and then clamp the block to the drill table.
Using
a V-block, center the block before drilling by lowering the drill bit to
the bottom of the vee and then clamp the block to the drill table.
How to drill the support holes without a drill press or V-block: Using card stock or a manila folder cut a strip about �� by 8� or so, wrap it around the tube and tape it so that you now have what looks like a �Cigar Band.� Remove the band and lay it on a table. Flatten the band so a crease forms at both ends. Example: say that the instructions ask for a hole 10 � inches from the end of the tube. Slide the �Creased Cigar Band� down the tube to the 10 �� inch mark. Position one crease at your mark and then rotate the tube over to the second crease and mark that location. Now you have drilling marks exactly opposite each other.
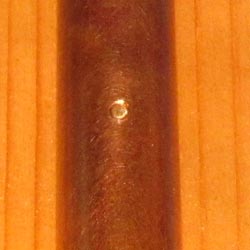
6. Deburr the support holes in preparation for your support line. Using a drill bit larger than the hole, place the bit on the outside of the hole and rotate by hand. This is generally enough to chamfer the outside hole.
 |
 |
 |
| Outside Before | Deburr | Outside After |
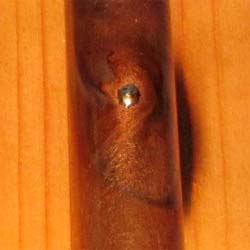
Deburr the inside support hole.
First, using a round or half-round file, remove the burr from inside the tube.
Finish the task by using a section of coat hanger wire with a small bend
approximately 105 degrees at the far end, as shown right. Place the wire in a
drill and insert the bent end thru the hole. As you rotate the wire, lightly
pull back on the drill and the bent wire will bend over any inside burr.
|
Inside Before
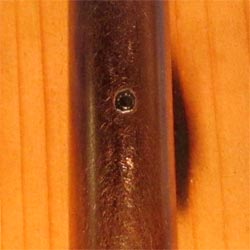
|
Inside After
|
Thanks to Dennis Offner for a tip about deburring. An alternate approach for deburring could be the deburring tools available from the Cogsdill Tool Company. They manufactures several types of deburring tools that deburr the outside then collapse to pass through the hole and then expand to deburr the back side of the hole. Using an electric drill, a set of chime tubes can be deburred in just a few minutes.
7. Select the method or style for the top support disk or ring and the material to be used.
For a long time, my favorite material has been treated lumber used for decking, although it did need a weatherproofing sealer. Also, white, or red cedar works well coated with a weatherproof sealer. The engineered wood for decks makes an excellent support plate and striker. If you know of someone installing a new deck using engineered wood, perhaps you can get a few scraps. One board is expensive and may not be worth the cost, but scraps are useful. Also, a half-inch thick nylon cutting board (old or new) works well. Some people will shop flea markets for that special circular disk made of most anything from metal to plastic plates, etc. In addition, wandering the aisles of Home Depot, Lowe's, Target, Mendelssohn's and your local drugstore have produced some surprising circular disk that can be drilled and are long lasting in the weather.
8. Select the top support disk cutout pattern for your specific tubing size and number of chimes in the set. Download the support disk and striker patterns from the website and just print the page specific to your tubing size and number of chimes in the set. You may need to print two copies, one for the support pattern and hole locations, and one for the striker pattern. To assist the wind striking all chimes use a fishing spinner for support. This allows the wind to slightly rotate the chime set. (Thanks to Terry for the suggestion.)
9. Select either a circular striker, a radial star striker, or a striker-keeper, all are included in the Wind Chime Support Disk and Striker Patterns
10. Select and print a pattern for the wind sail from selections in Patterns for Wind Sails/Catchers available on the website, or design your own design.
11. Weather protect the top support disk or ring, the striker and the sail with a UV protective finish. Decorate the chime tube as desired. A few suggestions here.
12. Select the line, cord or chain for supporting both the chime tube and the top support disk.
13. Select the style for hanging the chime tubes, i.e. top aligned, center aligned or bottom aligned. Bottom aligned is best because it allows the striker to easily contact the bottom edge of all chimes, the ideal strike location. Top aligned may have a more aesthetic appeal and on occasion some like center alignment.
Also, you want to keep the
distance between the chimes and the support desk quite short, no matter how
they are aligned.
This is to assist alignment during high winds. If they dangle too far below
to the support plate, they can bump into each other and occasionally get
mixed up with each other. A few inches would be best.
14. Select the sequence for locating the chimes on the support disk or ring.
15. Attach the support line or chain to the chime using a simple jig you can make. You can use an appropriately sized darning needle for threading line through the top support holes and tubes during assembly.
16. In your workshop, temporally hang the support disk or ring just above eye level. Depending on your alignment selection (top, bottom or center) hang each chime according to both the alignment requirement and the chime sequence diagram. Or you can use an alignment jig as described here.
17. Hang the striker according to the alignment diagram and avoid striking exact dead center for any chime. All three locations work well when you keep the striker away from the center dead zone for the first overtone. Don't worry about killing the first overtone with center placement. The first overtone dead zone is very narrow and easily overcome with a slightly off-center strike.
|
Metal Tubing
|
Always try your local building supply store. In addition to visiting the hardware section in these stores investigate tubing used for closet hanging poles, shower curtain poles, chain link fence rails and post. Yard or garage sales can yield surprising results, look for a discarded metal swing set, tubular shelving, etc. With permission look for discarded materials on constructions sites. Try your local metal recycler; they can yield very economical rod and tubing. Online sources: Amazon, eBay and the like can surprise you at times, offering small orders at good prices. Speedy Metals accepts orders for small quantities of tubes or rods. (Aluminum, Brass, Cast Iron, Copper, Steel and Stainless) Online Metals: 1 inch OD x 0.125 inch wall x 0.75 inch ID Aluminum Round Tube 6063-T52-Extruded, 60 inches long about $20/each Amazon, set of five (5 pcs) aluminum tubes, 1 inch diameter x 60 inches long with a wall thickness of 0.024 inch for $24. Amazon, 1� inch diameter x 72 inch long x .057 inch wall thickness (1 pcs) bright dipped aluminum, about $31/each Titanium Joe (Tubing) Titanium is a silver color, low density and high strength metal that is highly resistant to corrosion in sea water, aqua regia and chlorine. You can use either grade 2 being pure titanium, which is softer and less popular, or grade 9 (3AL-2.5V), which is the more popular high strength. The grade 9 numbers represent the percentage of Aluminum and Vanadium. The DIY Calculators work equally well for both grades.
Widener
Metals is a small metals distributor supplying pipe, tubing and
other misc. materials. Stocking stainless, aluminum and carbon steel
from 1/8 inch diameter up thru 12 inch diameter with various wall thickness'
from very light to very heavy. No minimum orders, offering material
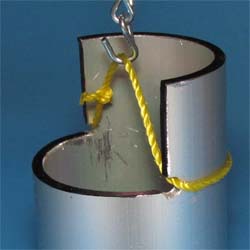
custom cut to length at no additional charge. Tanks bells can be crafted from out-of-service compressed gas/air tanks, scuba diving tanks or fire extinguishers. A most likely source can be your local testing facility for each type of tank. Ask your local fire department, welding shop and scuba diving shop for their recommendation for a testing company. You may be required to provide a letter to the testing company stating that you will cut the tank in pieces and render it unable to hold compressed air or gas. |
|
Hoops & Rings |
Try hobby stores for rings or hoops often used for dream catchers, mandelas or macram�. Some are chrome plated steel and others may require paint. Support rings can be cut from an out of service aluminum fire extinguisher using an abrasive metal cutting saw blade in a radial arm saw, a chop saw or a table saw as described in step 3 above. |
|
Eyelets-Grommets |
Small eyelets can often be located at your local hobby store in the sewing department, Joann Fabrics or a shoe repair store. You can also use the outer shell of a 1/8 inch or 3/16 inch aluminum pop rivet. Remove the nail-like center and use the rivet. Heat shrink tubing can be found online at Amazon. |
|
Metallic |
Thin braided wire or 1/32 to 1/16 inch stainless steel cable, or decorative chain that is zinc plated, brass plated, or painted can be located in hardware and home improvement stores. Try a hobby store for small aircraft control line cable. |
|
Non Metallic |
Make sure the line is UV resistant. Choices include fishing line (both 80 pound (35 Kg) braided or 30-50 pound (12-22 Kg) monofilament), braided nylon line, braided plumb line, braided Dacron kite line, light weight string trimmer weed eater line (.065 inch), and braided electrical conduit pull line. |
|
Striker Material |
A hockey puck, redwood, red cedar, red oak, treated lumber or a 1/4 inch nylon cutting board work well for large diameter chimes. Smaller diameter, higher frequency chimes benefit from a harder wood such as white oak, teak or Osage-orange (aka hedge-apple). Be sure to coat the striker with a UV resistant coating. |
 A
safe choice by many wind chime suppliers has been the pentatonic
scale (C D E G A). An enhancement to that scale can be the C9 Chord (C E G Bb
and D) which has a wider note separation for a good sound both close in and at a
distance from the chime.
You can also select a chord to you liking to maximize the useable
tubing in standard hardware store lengths. See this website to
view all the piano chords
www.pianochord.org, Thanks to site visitor Lewis for this suggestion.
A
safe choice by many wind chime suppliers has been the pentatonic
scale (C D E G A). An enhancement to that scale can be the C9 Chord (C E G Bb
and D) which has a wider note separation for a good sound both close in and at a
distance from the chime.
You can also select a chord to you liking to maximize the useable
tubing in standard hardware store lengths. See this website to
view all the piano chords
www.pianochord.org, Thanks to site visitor Lewis for this suggestion.

With that in mind, we have DIY calculators for all musical notes or for specific scales such as the pentatonic or the C9 Chord. You select the metal and the tubing size (ID and OD) and the calculator will provide the correct length and hang point for each note. The longer the chime the lower the notes will sound. So if a specific tuning like Westminster traditionally begins in the C3 octave, like B3-E4-F#4-G#4, feel free to begin an octave lower, like C2, which would look like this, B2-E3-F#3-G#3.
|
Note Selection Table |
||
|
Name |
Notes |
Number of Chimes |
|
Westminster |
B3 - E4 - F#4 - G#4 | 4 |
|
Pentatonic Scale |
C - D - E - G - A | 5 |
|
C9 Chord |
C - E - G - Bb - D | 5 |
|
Hava Negila |
C - Db - E - F - G (opt Ab) | 5 |
|
Corinthian Bells Key of A |
A - B - C# - E - F# - A | 6 |
|
Corinthian Bells Key of B |
B - C# - D# - F - G# - A# | 6 |
|
Corinthian Bells Key of C |
C - D - E - G - A - C | 6 |
|
Corinthian Bells Key of Eb |
Eb - F - G - Bb - C - Eb | 6 |
|
Corinthian Bells Key of G |
G - A - B - D - E - G | 6 |
|
Canterbury |
D4 - E4 - F#4 - G4 - A4 - B4 | 6 |
|
Trinity |
D4 - G4 - A4 - B4 - C5 - D5 | 6 |
|
Winchester (or Wynchestre) |
C4 - D4 - E4 - F4 - G4 - A4 | 6 |
|
St. Michael�s |
F4 - G4 - A4 - Bb4 - C5 - D5 - E5 - F5 | 8 |
|
Happy Birthday |
C5 - D - E - F - G - A - A# - Bb - B - C6 | 9 |
WALKING or TRAVELING CHIMES Walking Chimes are chimes mounted on a stationary support, typically in a
straight line, allowing the walker to strike each chime in sequence thus playing
a song.
Here is an example by
Carol RaedySpace the chimes so when the player walks at a steady pace it plays the song. Each word and dash represents a beat. You can use any length for the beat but it must be consistent. You could begin with one beat = 12 inches and modify from there.
For instance: �Joy� counts as one beat, so you will measure six lengths from where you hang the �joy� bell (Joy plus five beats) and then hang the �to� bell. Measure one length from �to� to �the� and from �the� to �world� since there are no beat between these words. Measure eight lengths from �world� to �all� (world plus 7 more beats) and so. The beats at the end are only if you want to make it in the round.
Site visitor Carol Raedy graciously provided the following note patterns for each song. Joy to the World by Hoyt Axton Joy(E5) _ _ _ _ _ to(D5) the(C5) world(C5) _ _ _ _ _ _ _All(G5) _ _ _ _ the(E5) boys(F5) and(D5) girls(E5) _ _ now(C5) _ _ _ _
Joy(E5) _ to(G5) the(G5) fish((A5) es(E5)
in(D5) the(C5) deep(Eb5) blue(D5) _ sea(C5) _ _ _
And(G4) joy(E5) _ _ to(C5) you(D5) and(D5) _ me(C5) _ _ _ _ _ _ _ _
Make New Friends
Make(C5) _ new(G4) _ friends(C5) _ _
but(D5) keep(E5) (G5) the(F5) (E5) old(E5) _ (D5) _
One(G5) _ is(G5) _ sil(G5) ver(A5)
and(G5) the(F5) oth(E5) _ er�s(D5) _ gold(C5) _ _ _
Auld Lang Syne
For(A5) _ auld(G5) _ _ (E5) lang(E5) _ (C5) _
syne(D5) _ _ my(C5) dear(D5) _
For(A5) _ auld(G5) _ _ (E5) lang(E5) _ (G5) _ syne(A5) _ _ _ _ _
We�ll(A5) _ take(G5) _ _ a(E5) cup(E5) _ o�(C5) _ Kind(D5) _ _ness(C5) yet(D5) _
For(E5) the(D5) sake(C5) _ _ of(A4) auld(A4) _ lang(G4) _ syne _
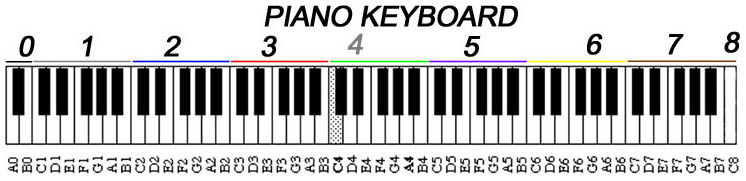
If the musical scale doesn't seem logical to you, you're right, it's not logical to most of us non musicians. An octave is from C to the key just prior to the next C, which would be B. Below is a graphical diagram that may help clarify this.
Another Must Read Caution-> Ending your project with a successful and pleasing sound is important and setting the right expectations will allow that to happen. Selecting musical notes for a chime is NOT like selecting notes on a piano or other string instrument, or reed instrument. When you strike C2 on a piano that is indeed what you hear but Not true for a chime cut for C2.
Tuning implies exactness and exact tuning cannot happen when you do not hear the fundamental note for the chime. When a piano key for C2 (65.4 Hz) is struck, you will indeed hear that note, 65.4 Hz. When a C2 chime is struck you will NOT hear 65.2 Hz. In fact. you will not hear the first overtone at 180 Hz and can barely hear the second overtone at 352 Hz. Most prominent will be the third overtone at 582 Hz which, on a piano, sounds like D5, but is not D5 because the mixing for all the overtones produces a completely new sound. The new sound is melodious, it sounds wonderful, but what note is it?
Tuning charts on this site list dimensions for notes ranging from C1 to C9, that imply exactness, which you now understand can not happen with a chime when you can't hear the fundamental note. Read more about the missing fundamental here. Why this happens is discussed in the section "The Science of Chiming".
For example, an orchestra grade chime that is physically cut for C2 will actually sound about like C5. To see a visual representation for what a chime is apt to sound like, see this chart. On the other hand, will the strike note for a chime sound pleasing and bell-like? Yes, absolutely, because of the large complement of overtones, even though the fundamental is missing.
Selections from about C2 to C4 sound the most bell-like but will not adequately radiate the fundamental tone. Unfortunately this effect complicates note selection if you are trying to strike exact notes lower than about C5. Above C5 the strike note will actually be the fundamental and you can expect to hear the selected note, but less bell-like than the C2 to C4 range. In fact, for that reason, orchestra grade chimes typically only cover 1 � octaves beginning at C5 and extend to about G6.
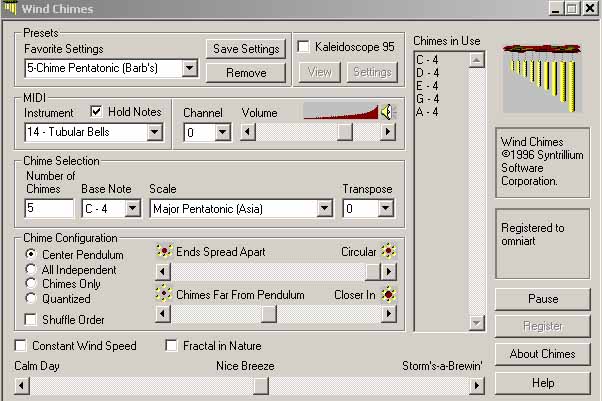
Wind Chime Emulation
Software Zip,
105 Kb
Original Syntrillium program from 1996 {Excellent} Help instructions are HERE
![]() Thanks to a site visitor for providing this excellent emulation
program from 1996 by Syntrillium. They are now defunct and we believe the
software is considered "freeware". The zip file contains the main program, the
registration codes and a help file. Unzip the download and run the
wind_chimes_1.01_syntrillium.exe file. The program is quite intuitive, full
featured and should be easy to operate. To begin I would suggest you set-up the
program as follows: Number of Chimes "5", Transpose to "0", Scale to "New
Pentatonic", Base Note "C-4", "Center Pendulum".
Thanks to a site visitor for providing this excellent emulation
program from 1996 by Syntrillium. They are now defunct and we believe the
software is considered "freeware". The zip file contains the main program, the
registration codes and a help file. Unzip the download and run the
wind_chimes_1.01_syntrillium.exe file. The program is quite intuitive, full
featured and should be easy to operate. To begin I would suggest you set-up the
program as follows: Number of Chimes "5", Transpose to "0", Scale to "New
Pentatonic", Base Note "C-4", "Center Pendulum".
Remember, the loudspeaker connected to your computer has the ability to play the low notes from C2 to C4 but a chime may not radiate those sounds. The program was originally designed to run on DOS 6 using Windows 95, and runs with Windows NT, W2000, W XP and W7 thru W10.

Strike a note or strike a chord?
Over the years much effort by many well-intentioned people has
been placed on exactly what is the best chord for a set of wind chimes? While a
musical chord can be pleasing to the ear, the effort to simultaneously strike
all the notes in a chord using the traditional circular shaped striker/clapper
has been a waste of time. The striker only contacts one, maybe two
chimes simultaneously.
This concept of sequencing and giving chime sets a name like Corinthian Bells, Winchester or Pentatonic is a marketing exercise to sell more chime sets. They do not play in sequence and the listener will likely never identify what the random sounds from a chime set really represent. They're just notes. Selling chimes with an advertised famous sequence is marketing and advertising on steroids, in my opinion.
The good news is that with some of our innovative striker designs we can now almost strike a chord. More on this in the striker section.
Also, if you dedicate a striker to each chime tube (internal or external to the chime) that configuration can ring several chimes at nearly the same time and approximate a chord. When using the traditional round striker it is much better to select notes that have a fair amount of separation allowing the ear to easily discern a variety of notes.
Often a traditional choice has been the pentatonic scale (C D E G and A.) This choice can sound pleasant close to the chime set but not so good at a distance.
The C9 chord (C E G Bb and D) can be used to widen the note separations for a five-chime set. The problem at a distance is the ear has difficulty discerning the closely spaced notes of the pentatonic scale.
Caution at a distance
I often hear the comment, "I have a set of chimes on my deck and they sound
great. However, I was over to my neighbor�s the other day and the chimes did not
sound so good. In fact, they sounded out of tune.
Why is this?" The answer lies in the conditions that make up the notes for the chime. As mentioned in the science section, a chime note is a combination of the fundamental strike frequency and the many overtones. Some of the overtones attenuate more rapidly than others at a distance. The original combination of strike frequency and overtones are not the same at a distance.
Remember, not always does the fundamental frequency contribute to the note and not always are there many overtones for a given note. The actual note depends on exactly where in the musical scale the chime is operating. When you have a chime that contains a larger number of overtones that are located in the higher frequencies, and mostly missing the fundamental, you can get this distance effect.
High frequency sounds attenuate more quickly in the atmosphere than do the lower frequencies. At a distance you are not hearing the same sound you hear close in. Some of the high frequency sounds can be greatly attenuated or missing. The chime can sound completely different under these conditions.
Typically this occurs when you select notes in the lower part of the scale. If your interest is making the chimes sound good at a distance of say 80-100 feet or more, consider increasing the diameter of the tubing from the traditional sizes ranging from half inch thru two inches, up to at least 3 inch or more; 4 to 6 inches are better.
A set of chimes designed for the C2 to the C3 octave have good acoustic radiation properties close to the set but not so good far away because of this distance effect. Additional information later on this page HERE.
Quieting the chime set: Chimes can easily become annoying so maintaining a subtle sound is important, particularly in high winds. Softening the striker often helps in addition the use of the keeper-striker. Typical striker materials are a rubber hockey puck or other soft rubber coverings found in the plumbing section of the local hardware store. Here are a couple examples.
The first example uses plastic aquarium tubing to cover the inside diameter of the keeper striker.
The second uses a 3 inch and a 4 inch section cut from of a PVC plug. for 3 or 4 inch PVC pipe.

Another
solution from site visitor Troy, is to drill holes at the top and bottom
nodes. Hang tubes so the bottom nodes line-up. Thread string through the nodes
with spacer between tubes. He used 4 mm poly garden water tubes he had on hand. Other spacers and line would also work.

Also, you can thread a 50# monofilament fishing line or weed trimmer line around the outside tips of the star to keep the tubes from escaping and mixed up. Drill a small horizontal hole at the tips for the monofilament line.
 Whether you want a set of large chimes used in the sound
healing and therapy arts, or you because of the
anticipated lower frequency sounds, similar to a large diameter gong, or because
you have a commission for an artistic display in a public location, building
big may not accomplish all your goals.
Whether you want a set of large chimes used in the sound
healing and therapy arts, or you because of the
anticipated lower frequency sounds, similar to a large diameter gong, or because
you have a commission for an artistic display in a public location, building
big may not accomplish all your goals.
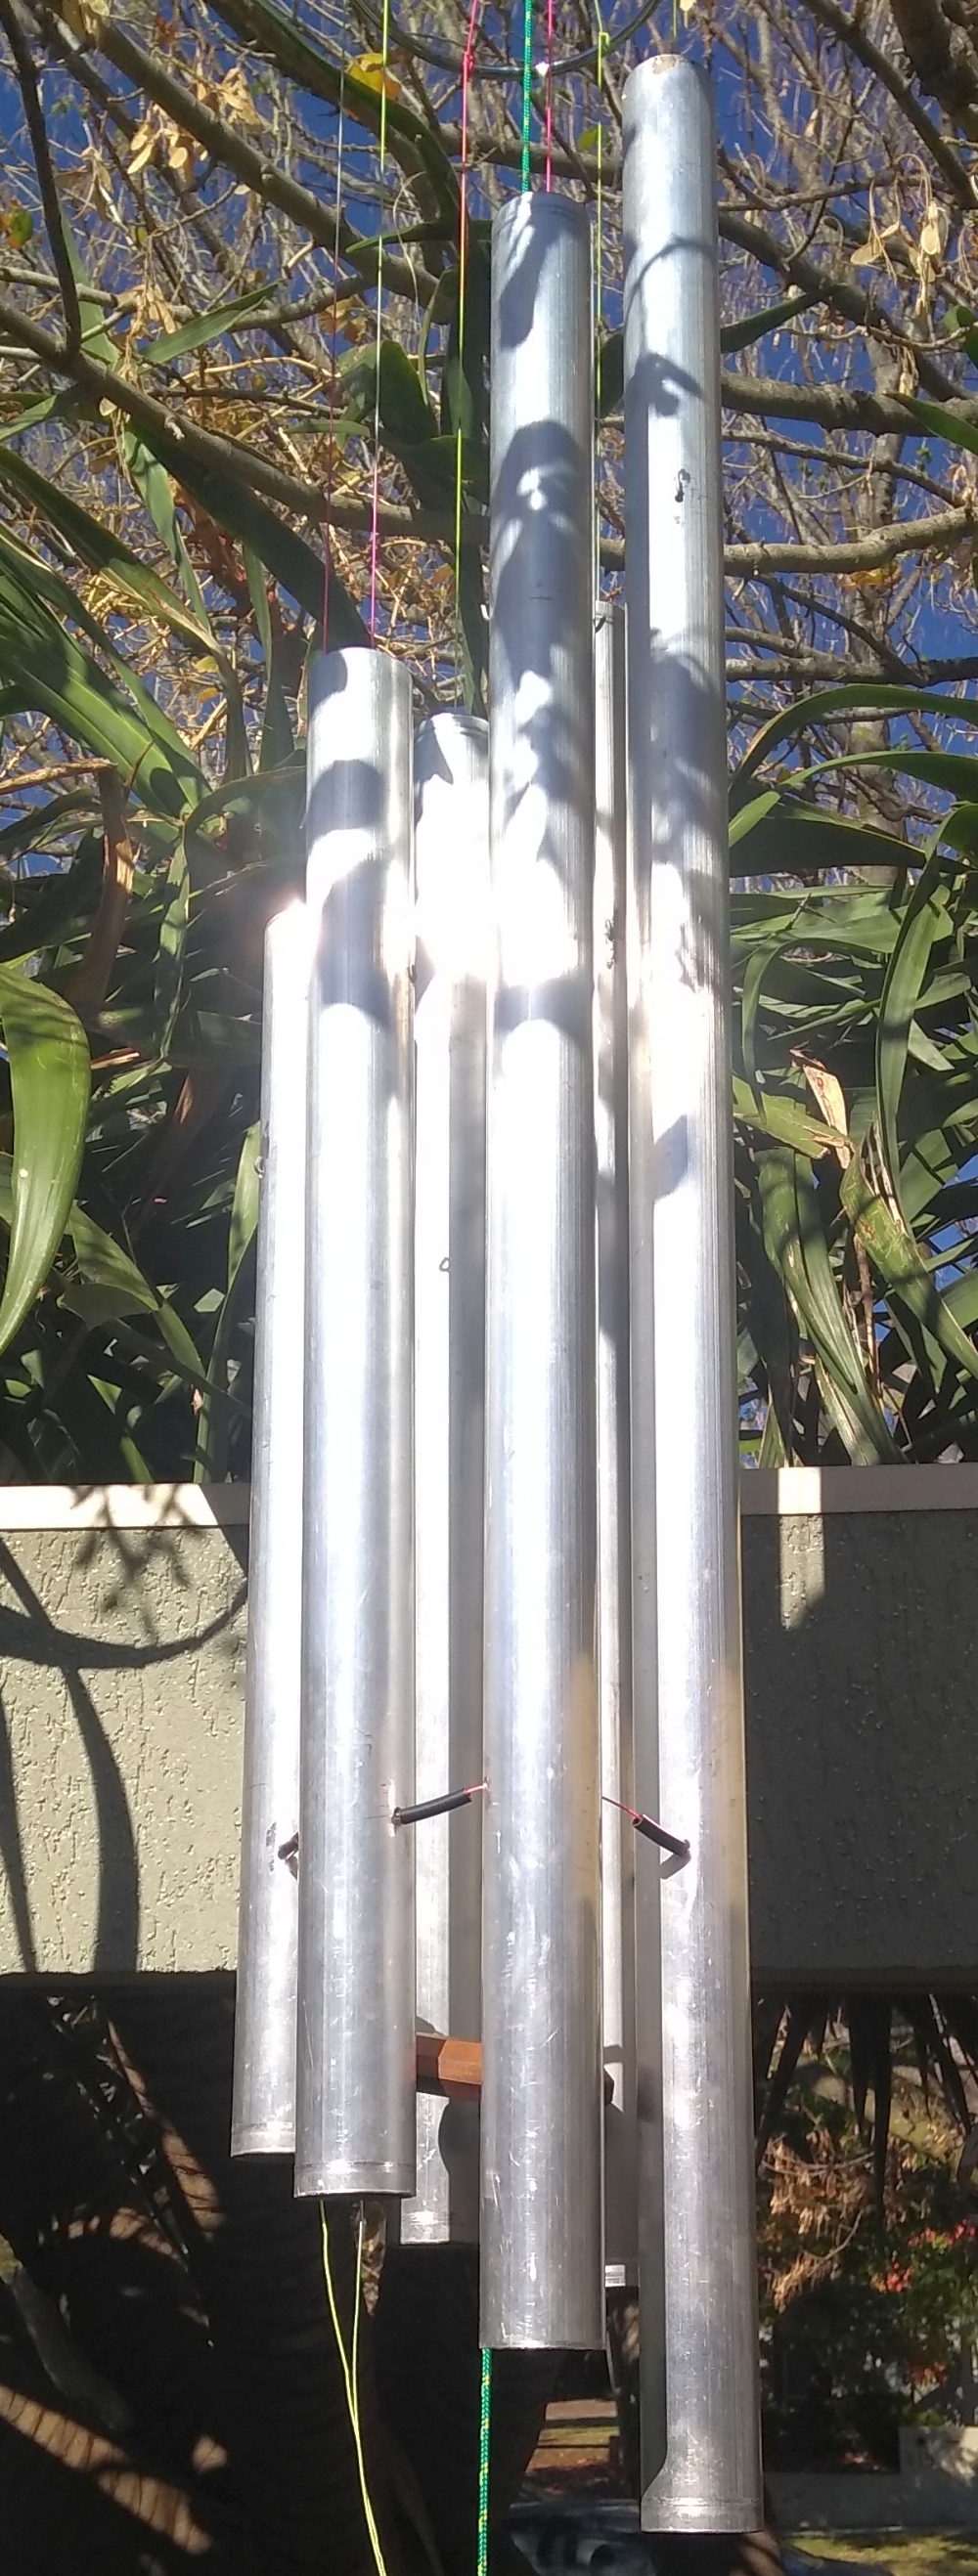
Certainly, a set of long, large diameter chimes as shown to the right (built by Chris from Wisconsin) will sound awesome, but a few words of caution before you head in that direction. Since you read the caution statement above about the missing fundamental and the issues with the small radiation surface area for a chime tube, you can better understand how the insensitivity of the human ear at low frequencies contributes to our inability to adequately hear the low notes, mostly below about C4.
I am often contacted from the website when someone wants to Build Big. After completion of their large chime set they write to say, "My new chime set sounds wonderful, but not as low as I expected."
Beginning
with the right expectations will help you move successfully along the
design path. Large diameter long chime sets are definitely worth the effort. Be
mindful of annoying nearby neighbors since this sound travels far.
Below is an attempt to demonstrate loudness and note selection at a distance.
Most often the chime designer considers cost, weight and aesthetics. Your budget may not approve the cost of copper and aluminum may be more favorable than steel because of weight. Chimes from EMT (electrical conduit) are galvanized and resist rust but not the support hole or the ends. Rust could be an issue long term for EMT. For the purposes of chime design use the steel selection in the calculator if you're EMT (thin wall conduit)..
Good source for tubing: Speedy Metals by the inch and no minimums for Aluminum, Brass, Copper, Cast Iron, Steel, and Stainless Steel, or Titanium Joe for titanium by the foot.
What metal sounds best? After the issues above are considered we can move to the question of what metal sounds best for a tubular chime? The short answer is the thicker the wall and the larger the diameter, the better they sound, not necessarily the type of metal.
However, what sounds best is a personal choice and I have not found a good answer for everyone. Some like a deep rich sound and other like the tinkle tinkle sound.
Copper chimes have a different timbre than steel chimes. The best I can advise is to visit a chime shop and test-drive a few chimes of different metals and different sizes.
When selecting tubing size and you're undecided between two sizes, select the tubing with more mass. More mass will produce a better sustain time. This selection may be the chime with a thicker wall or a larger diameter.
On small diameter chimes (about 1/2 to 1 1/4 inch) do not use tubing with an unusually thick wall. When the wall thickness is large compared to the diameter, the extra stiffness can actually inhibit sustain time.
Always test the sound of tubing before deciding, particularly if you are evaluating several sizes. Support the tube at the 22.4% location using a string, and strike with something like a heel of a hard rubber shoe or a wood mallet.
You may hear someone say they like aluminum best or copper best. To better understand the difference in metals let�s build two 5-tube sets of chimes using the C9 chord beginning with the C2 octave. One set from aluminum, 2� OD with a 1/8� wall thickness, and the other set from steel, 2� OD with a 1/8� wall thickness. While each set will have different calculated lengths, they will both strike the same fundamental note, but sound completely differently. Why is that?
Contrary to intuition there are only two variables that control the sound of a chime, i.e. the density and elasticity of the metal. Those two variables control the specific length dimensions to achieve a desired note for a given tubing size and wall thickness.
From the chart below you can see that aluminum has the lowest density and the lowest modulus of elasticity (deforms easier than the others) , while copper has the highest density but is only midrange for elasticity.
What does all this have to do with what metal sounds best? The differences among metals cause a difference in timbre for the same note.
|
|
On occasion you may hear someone say they like aluminum chimes best. That likely occurs because the lower modulus of elasticity for aluminum requires less strike energy for resonant activation and for a given input of strike energy. The aluminum chime can be louder and have an increased sustain time. However, the difference among metals does not make one metal good and another bad. There are no bad sounding chimes when the notes are properly selected, teh tubes are properly tuned and properly mounted. It's impossible to have a set of chimes for the same note range made from aluminum sound the same as a set made from steel or any other metal, because of their difference in density and elasticity.
If you want the smallest possible chime set for a given note range use brass. Opposite to brass, EMT will provide the largest physical set for a given note range. For example, see the table below organized smallest to largest for middle C (C4).
| Length for a one inch diameter chime at middle C (C4) , smallest to largest. | ||||||
|
Brass .065 wall |
Copper M |
Cast Iron |
Titanium .065 wall |
Aluminum .065 wall |
Aluminum .035 wall |
EMT |
|
26 1/8 inch |
27 inch |
28 7/16 inch |
29 1/8 inch |
29 5/16 inch |
30 7/16 inch |
32 7/8 inch |
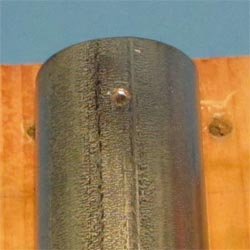
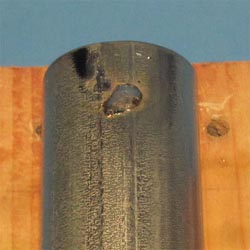
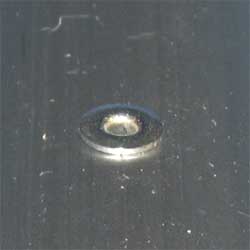
Quality Caution:
Not all tubing is created equal:
 Be aware that some tubing may produce a beating effect when
struck (the wah-wah effect). Two closely spaced frequencies will interact to
produce a third frequency. This is often due to variations in the cross section
of the tubing caused by inconsistencies in the manufacturing process.
Be aware that some tubing may produce a beating effect when
struck (the wah-wah effect). Two closely spaced frequencies will interact to
produce a third frequency. This is often due to variations in the cross section
of the tubing caused by inconsistencies in the manufacturing process.
The elasticity and the density of the tubing will be different, depending on where the tube is struck. The tube can produce two closely spaced frequencies and these two frequencies will produce the beating effect.
Some people enjoy this effect and others may find it annoying. If you want to avoid this wah-wah effect, make sure you acquire high quality tubing � or test a small piece before buying in bulk.
While some tubing may be considered poor quality for musical requirements, it can be excellent for structural needs. The problem with tubing that exhibits this effect is that it makes precise tuning more difficult.. Listen HERE (mp3) to the beating sound for the tube shown to the right.
If you know the exact material density and modulus of elasticity, enter those parameters into the DIY Calculator on the data page, when using the DIY calculator.I want to emphasize that good tuning will certainly help to accurately produce the appropriate overtones for the selected note, particularly for the higher note ranges.
About Tubing Dimensions:
Aluminum and brass tubing tend to exactly follow their stated ID and OD
dimensions while copper tubing does not.
Wall thickness for copper pipe varies with the pipe schedule. The four common
schedules are named K (thick-walled), L (medium-walled), M (thin-wall), and DWV
(drain/waste/vent - non-pressurized).
The printing on the pipe is color coded
for identification;
K is Green,
L is Blue, M is Red,
and
DWV is Yellow.
Both type
M
and type
L
copper
can be found in the plumbing section of home improvement stores like
Menards�,
Home Depot�,
Lowe's�
and
Ace Hardware�.
Pre-calculated tube
lengths for some common metals used in chimes are in the table
below.
If you desire a size different than the pre-calculated tables, use the
DIY Excel Calculator.
|
Pre-calculated Tube
Length and Hang Point Dimensions All Notes [English and Metric] PDF Most browsers can now display PDFs Other free PDF readers Adobe� Foxit� |
|||||||||||
|
Click on a specific metal and size to download dimensions or the top row to download a family of dimensions |
|||||||||||
|
OD or |
Wall Thickness in Inches | ||||||||||
|
0.50 |
|||||||||||
|
0.75 |
Alum | ||||||||||
|
1.00 |
|||||||||||
|
1.25 |
|||||||||||
|
1.50 |
|||||||||||
|
1.75 |
|||||||||||
|
2.00 |
|||||||||||
|
2.25 |
|||||||||||
|
2.50 |
|||||||||||
|
3.00 |
|||||||||||
Caution-> these values allow you to get close to the desired note (typically within 1%) but if you desire an exact note, cut slightly long and grind to the final length, but not required for wind chimes.
Do not use these calculations for an orchestra or a musical setting unless you are certain they use A=440 Hz.
An orchestra or symphony may brighten slightly and will typically tune for A=442, 43 or 44 The above chart uses A = 440 Hz. Most symphony grade instruments are shipped with A=442 Hz. Also, orchestra grade chimes typically do not go below the C5 octave.
There are manufacturing dimensional tolerances that may cause slight inaccuracies in the actual results not to mention the effects of poor material handling, along with slight variations in material properties and impurities. If in doubt, cut slightly long and grind to final values. You can measure frequency for verification using any number of software programs listed here
Nominal
Copper
Copper
Steel
1/2
3/4
1
1 1/4
1 1/2
2
2 1/2
3
3 1/2
4
Pre-calculated Tube Length and
Hang Point
C9 Chord
[English and Metric] PDF
Size
Inches
Type L
Blue
Type M
Red
EMT
Thin-wall
Below are dimensions for Type L and
Type M Copper Tubing, and EMT
dimensions.
| Type L Copper Tubing |
. |
Type M Copper Tubing | ||||||||
|
Nominal
|
Actual OD |
Actual ID |
Wall |
Nominal
|
Actual |
Actual |
Wall |
|||
|
1/2 |
5/8 |
0.625 |
0.545 |
0.040 |
1/2 |
5/8 |
0.625 |
0.569 |
0.028 |
|
|
3/4 |
7/8 |
0.875 |
0.785 |
0.045 |
3/4 |
7/8 |
0.875 |
0.811 |
0.032 |
|
|
1 |
1 1/8 |
1.125 |
1.025 |
0.050 |
1 |
1 1/8 |
1.125 |
1.055 |
0.035 |
|
|
1 1/4 |
1 3/8 |
1.375 |
1.265 |
0.055 |
1 1/4 |
1 3/8 |
1.375 |
1.291 |
0.042 |
|
|
1 1/2 |
1 5/8 |
1.625 |
1.505 |
0.060 |
1 1/2 |
1 5/8 |
1.625 |
1.527 |
0.049 |
|
|
2 |
2 1/8 |
2.125 |
1.985 |
0.070 |
2 |
2 1/8 |
2.125 |
2.009 |
0.058 |
|
|
2 1/2 |
2 5/8 |
2.625 |
2.465 |
0.080 |
2 1/2 |
2 5/8 |
2.625 |
2.495 |
0.065 |
|
|
3 |
3 1/8 |
3.125 |
2.945 |
0.090 |
3 |
3 1/8 |
3.125 |
2.981 |
0.072 |
|
|
3 1/2 |
3 5/8 |
3.625 |
3.425 |
0.100 |
3 1/2 |
3 5/8 |
3.625 |
3.459 |
0.083 |
|
|
4 |
4 1/8 |
4.125 |
3.897 |
0.114 |
4 |
4 1/8 |
4.125 |
3.935 |
0.095 |
|
|
5 |
5 1/8 |
5.125 |
4.875 |
0.125 |
5 |
5 1/8 |
5.125 |
4.907 |
0.109 |
|
|
6 |
6 1/8 |
6.125 |
5.845 |
0.140 |
6 |
6 1/8 |
6.125 |
5.881 |
0.122 |
|
|
Electrical Metallic
Tubing (EMT)
aka thin-wall conduit |
||||
|
EMT |
Actual |
(ID) |
Wall |
Gauge |
| 3/8 |
.577 |
.493 |
.042 |
19 |
|
1/2 |
.706 |
.622 |
.042 |
19 |
|
3/4 |
.922 |
.824 |
.049 |
18 |
|
1 |
1.163 |
1.049 |
.057 |
17 |
|
1 1/4 |
1.510 |
1.380 |
.065 |
16 |
|
1 1/2 |
1.740 |
1.610 |
.065 |
16 |
|
2 |
2.197 |
2.067 |
.065 |
16 |
|
2 1/2 |
2.875 |
2.731 |
.072 |
15 |
|
3 |
3.500 |
3.356 |
.072 |
15 |
|
3 1/2 |
4.000 |
3.834 |
.083 |
14 |
|
4 |
4.500 |
4.334 |
.083 |
14 |
|
|
||||
| Pre-calculated length for resonant metal rods. | ||||||
| Rod Length and Hang Point, A4=440Hz | ||||||
| Diameter inches |
|
Diameter mm | ||||
| Aluminum | Brass | Steel | Aluminum | Brass | Steel | |
| 1/4 | 1/4 |
|
6 | 6 | 6 | |
| 3/8 | 3/8 |
|
8 | 8 | 8 | |
| 1/2 | 1/2 |
|
||||
|
|
||||||
|
|
||||||
|
|
||||||
|
|
||||||
|
|
||||||
|
|
||||||
|
|
||||||
|
|
||||||
|
|
||||||
|
|
||||||
|
|
||||||
|
Values can vary slightly because of
manufacturing tolerances for |
||||||


A 45� cut at the bottom or top of the tube can add a nice aesthetic touch; however, the tuning for each chime tube will change considerably from the 90� cut value. The shorter the chime the more the tuning will change. For example, here are the changes for a 5-chime set made from 2 inch OD aluminum with a wall of .115 inch. The set was originally cut for the pentatonic scale (CDEGA) beginning at C6 using 90� cut tubing. After a 45� cut at the bottom end of each tube, the tuning increased from about 5% to 9% depending on length. Unfortunately, the rate of change was not linear, but a value specific to each length of tubing. Tuning increase was C6 =+5.5%, D =+6.6%, E =+7.5%, G =+7.6% and A=+8.8%. Your notes may change more or less than these.
Additional testing was performed for a number of different diameters and different lengths using aluminum, copper and steel tubing. The results were very consistent. Short thin-walled tubing of any diameter changed the most and long thick-walled tubing of any diameter changed the least. Short tubing (around 20 inches) could increase the tuning by as much as 9 to 10%. Long tubing (35 to 40 inches or more) could change as little as 2%. It was impossible to predict the change other than the trend stated above for short vs. long. This was not surprising because shorting a tube will naturally increase the note frequency.If you want to maintain exact tuning using a 45� cut, cut the tube longer than the value suggested by the DIY calculator or the pre-calculated tables, and trim to final value using your favorite tuning method. If exact tuning is not required or important, cut the tubing to the suggested length by the calculator to pre-calculated chart, and trim the end at 45�.
If you are attempting to create exact notes for an orchestra setting, exact tuning is required and the use of an electronic tuning device or a good tuning ear is necessary. On the other hand, if you desire a good sounding set of chimes but do not need orchestra accuracy, then carefully cut and finish to the length suggested by the pre-calculated table or the DIY calculators listed above.
Frequency
measurement:
Measuring the exact frequency and musical note of the chime is challenging at
best.


Read the caution about chromatic tuners below!
There are a host of apps for Chromatic Tuners available for an iPhone, iPad or Android. Site visitor Mathew George uses �gStrings� on his Android, pictured right.
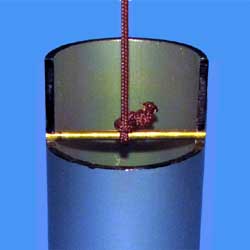
I use the $.99 app �insTuner� on an iPad that includes an FFT spectrum analyzer in addition to freeware Audacity� on a Laptop described below.. A few scrap pieces of wood to make two U-brackets, rubber bands and you're in business. Mark the support nodes 22.4% from each end for locating the rubber bands.
If you have just a few measurements to make, a quick and easy support suggestion is a string with slipknot positioned at the 22.4% node, pictured above with the iPad.
Caution-> It can be challenging and often impossible for a chromatic tuner to measure a chime note correctly. Non linearity of the human ear and a chime's non-harmonic overtones are two reasons.
Chromatic tuners listen and display sound as it is being produced on a linear basis for both amplitude and frequency, but our brain process the same information using fuzzy logic. Why is this a problem?
Unfortunately, the human ear is no doubt the most non-linear and narrowband sound listening device we know of. Similar to other percussion instruments, chimes do not produce fundamental frequencies and pure harmonic frequencies like string instruments, wind tubes and reed instruments, for which chromatic tuners are intended.
Instead, there are numerous non-harmonic overtones present which (depending on their individual frequency and amplitude) can be predominant to a tuner or analyzer, but make little or no difference to the human ear. A chromatic tuner may display the predominant amplitude and frequency, but that may not be what the ear actually perceives. Because of the brain's "fuzzy logic" characteristic, the many overtones associated with a particular chime fundamental frequency, combine to produce a musical note the brain recognizes, but may not be recognized by a chromatic tuner.
It is difficult to provide an exact recommendation when to use the tuner to measure a chime's note, but in general, I find most any note below C4 difficult to measure and on occasion below C5. Long, low frequencies tubes, mostly measure incorrectly because of the "missing fundamental effect" and the preponderance of high amplitude overtones. Thick-walled tank chimes/bells can measure with surprising accuracy because of a single pure tone above C4 that is not cluttered with unimportant sidebands. However, thin-walled tank chimes/bells seem not to do as well and they may be impossible to measure accurately.
In addition, poor quality tubing exhibiting dual fundamentals, will cause the chromatic tuner to constantly switch between the two fundamentals, both of which are incorrect. If you are not displaying the note you expected, try moving the chime further away from the tuner to help minimize unimportant frequencies.
If you get a good steady reading that is not what you expected, the tuner is listening to a predominant overtone, so just ignore that measurement. Using the values for length provided by the tables and DIY calculators on this page will get you very close to the exact note. If the tuner cannot make a believable measurement, use the calculated length for the chime.
 A
good software solution for FFT spectrum analysis measurement is the freeware
program Audacity� used on a Laptop pictured to the left-hand side.
A
good software solution for FFT spectrum analysis measurement is the freeware
program Audacity� used on a Laptop pictured to the left-hand side.
A few additional software sources are listed below. Most any computer microphone will work. In fact, I have used the microphone on a headset.
To eliminate the annoying background noise when using a microphone, use an accelerometer. I have good success supporting the chime horizontally at one node by a rubber band and at the other node by a thin wire looped around the chime and attached to an accelerometer.
DL4YHF's Amateur Radio
Software: Audio Spectrum Analyzer
(Spectrum Lab)
Laptop freeware good for fundamental and overtone frequency measurements, and a
real-time display.
![]() Tune Lab Pro version 4
Laptop freeware good for fundamental and overtone frequency measurements. At a
cost, available for the iPhone, iPad and iPod Touch, Windows laptops, Windows
Mobile Pocket PCs, Smartphones, and the Android.
Tune Lab Pro version 4
Laptop freeware good for fundamental and overtone frequency measurements. At a
cost, available for the iPhone, iPad and iPod Touch, Windows laptops, Windows
Mobile Pocket PCs, Smartphones, and the Android.


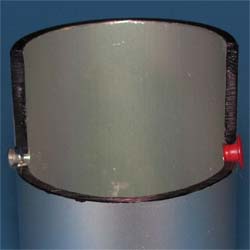
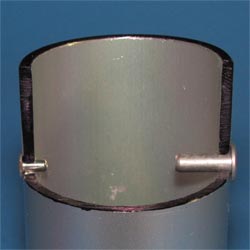
The ideal chime support location to allow for a lengthy sustain time is positioned at either of two locations; at the fundamental frequency node located 22.42% from either end, or at the very end using a string or cable threaded through an end cap.
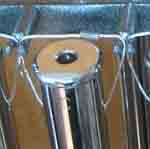
If sustain time is not a requirement (which makes a tubular chime, a bell sounding chime) such as for orchestra chimes pictured to the right, then support can be through horizontal holes near the end of the tube. A chime supported in this manner reduces most of the sustain time. I do NOT recommend this method of support to achieve a great sounding set of chimes.
You may see commercial wind chimes supported in this manner, but they cannot support the tradition bell-like sound that you may be expecting. Incorrect support ranks as the number one mistake made by some commercial chimes sets on the internet and in stores. They will produce a strike note but lack the rich resonant bell-like sound that results from proper support.
The
first support
method for a bell-like sustain time uses the traditional fundamental
 frequency node which is 22.42% from either end. See the Transverse vibration
mode diagram at the right.
An important objective for a bell-like chime is to preserve the resonance of the
chime as long as possible.
frequency node which is 22.42% from either end. See the Transverse vibration
mode diagram at the right.
An important objective for a bell-like chime is to preserve the resonance of the
chime as long as possible.
Accurate placement for the support holes helps to assure the high quality (Q) or hang-time or sustain time for the chime. A hole size of 1/16 inch can be drilled directly on the location mark but for larger holes, try to place the top of the hole so it aligns with the location mark. If you're curious about other support locations, it is possible to support the chime at the first, second or third overtone node, but not recommended.
All charts and calculations on this page are for the support line to be located at the fundamental frequency node which is 22.42 % from either end and is the optimum location. If you happen to have a background in both mechanical vibration and acoustic vibration, it is easy to confuse overtones and harmonics. Overtones = Harmonics -1, or Harmonics = Overtones + 1.
This acoustic harmonic relationship has no connection to the radio frequency definition of harmonics.
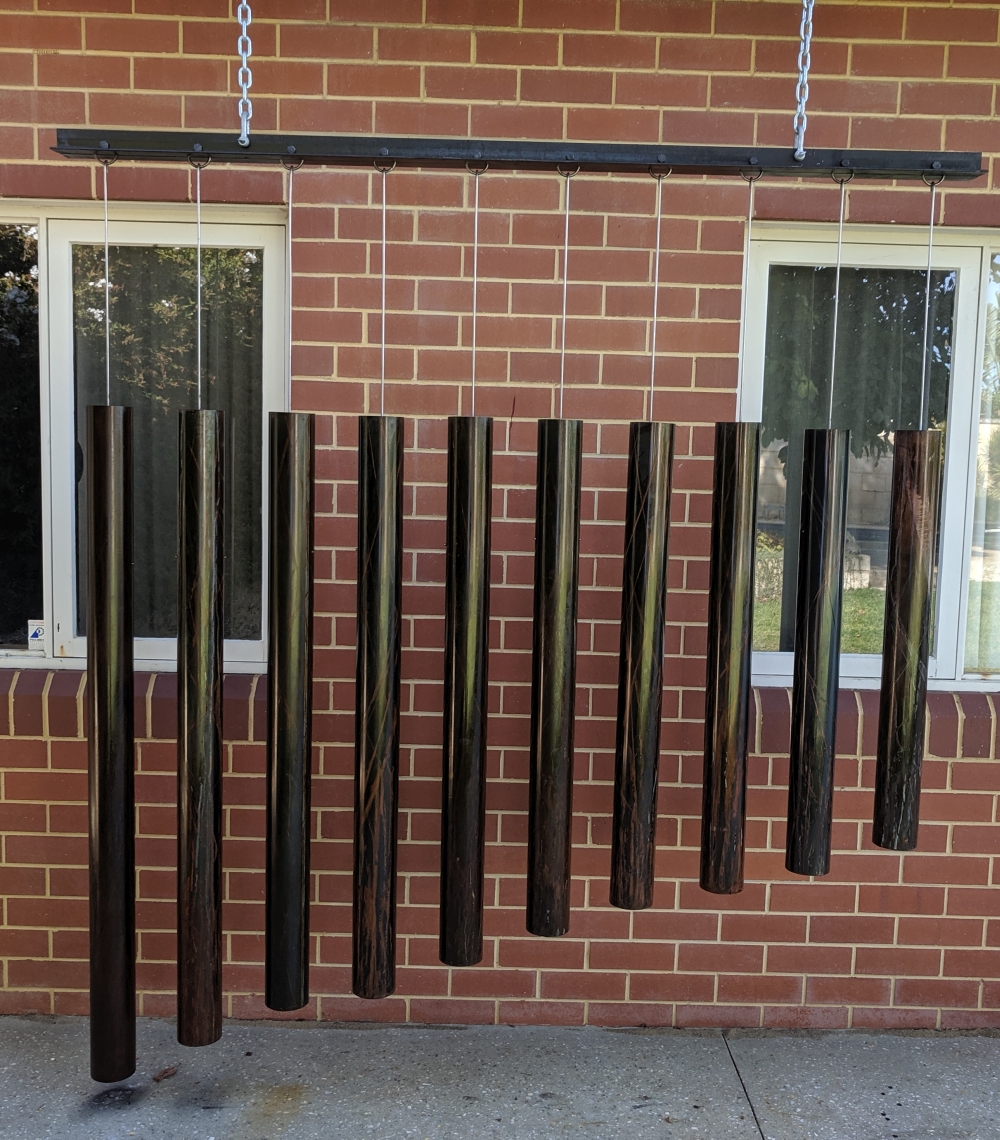
While making this nice steel 10-chime set, site visitor David, made a good video demonstrating how to locate the hang-point node using the chime's natural vibration nodes and a small pile of sand. See his video here www.youtu.be/e7o7hf1AOl4
|
|
|
|
|
1st Fundamental Frequency |
1st Overtone, 2nd Harmonic |
2nd Overtone, 3rd Harmonic |
| Animations courtesy of Dr. Daniel A. Russell, Professor of Acoustics at Penn State University. | ||


|
|
|||||||||||||||||||||||||||||||||||||||||||||||||||||||||


![]()
|
|||||||||||||||||||||||||||||||||||
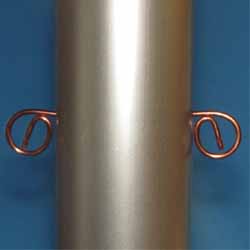

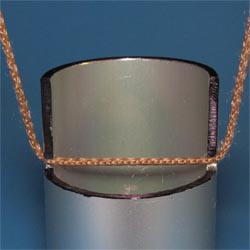
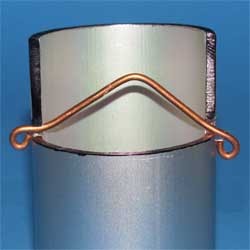
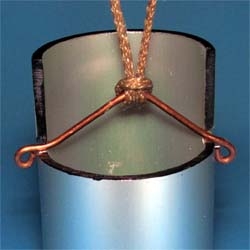
An alternate inverted �V� support can be the wire arm from a binder clip shown on the right. Remove the wire arms from the clip, stretch them out a little, and position in place using needle nose pliers, wiggle the arm until the tips pop out of the holes. Be sure to attach your hanger line first. The arms tend to be self centering. The binder clips are available in different sizes so you can match the clip to the diameter of the pipe. The wire diameter increases with the size of the clip so make sure to check before you drill the pipes. (Submitted by site visitor Tom, Thanks)
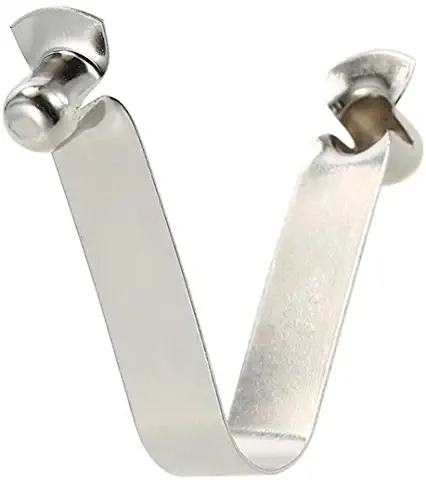 Another
option is the stainless-steel butterfly V-clip used in pool poles and tent poles
as shown here. There are plastic versions and stainless-steel versions, both are
on Amazon. Search for keywords ( Kayak Paddle Spring Clips Tent Pole Clips Push
Button Spring Snap Clip Locking Tube Pin). The stainless-steel clip can be made
to work on tubing sizes up to a 2-inch diameter. Not sure how small a diameter
tubing will work but I suspect � inch might be the smallest. Submitted by site
visitor Ed. Thanks Ed!
Another
option is the stainless-steel butterfly V-clip used in pool poles and tent poles
as shown here. There are plastic versions and stainless-steel versions, both are
on Amazon. Search for keywords ( Kayak Paddle Spring Clips Tent Pole Clips Push
Button Spring Snap Clip Locking Tube Pin). The stainless-steel clip can be made
to work on tubing sizes up to a 2-inch diameter. Not sure how small a diameter
tubing will work but I suspect � inch might be the smallest. Submitted by site
visitor Ed. Thanks Ed!
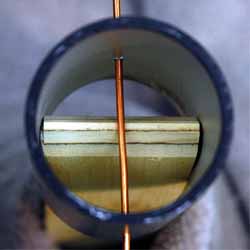
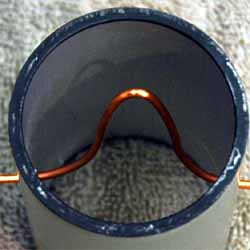
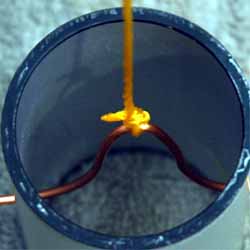
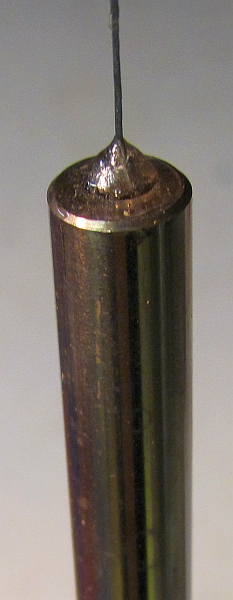
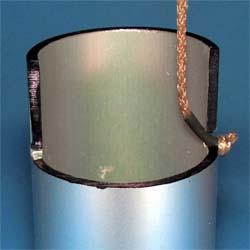
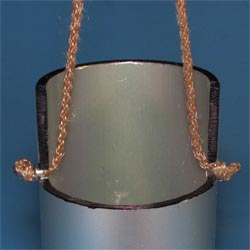
Another alternate support was submitted by Bud (Thanks): I place a copper wire into a copper pipe and threaded it thru one of the hanging holes, then solder it to the pipe (then cut and grind the excess flat with the tube), and the same for the other hanging hole. Now I have 2 copper wires coming out the inside top of the pipe. I chuck them up to a drill motor and twist, being careful not to kink the wire. Twisting will center the wires in the tube and leave a good looking single wire coming out the center of the pipe. This also would work with steel tubing. This seems to work okay and it looks cool with the twisted wire.
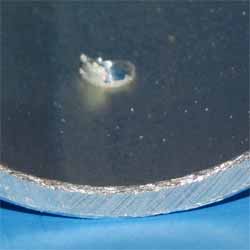
It is important to understand that the end cap lowers the fundamental frequency and some associated overtones from values calculated by the DIY calculator or Pre-calculated charts. For 1/2 inch copper tubing type L, the fundamental is lowered by about 3% to 6% from calculated values on this page. For 3/4 inch type L copper tubing the fundamental is lowered by about 11% to 12%.
The good news is that the end cap noticeably increases the duration for the first overtone and the chime has a much more bell-like sound. Look at these two spectral waterfall displays and specifically compare the hang time of the 1st overtone for each. You will notice a considerable increase in sustain time for the end cap supported tube.
Caution->
be certain to solder the end caps
in place. An unsoldered or loose fitting end cap will completely kill the
resonance. An end cap must contact the entire circumference at the end of the
chime to function properly.
|
|
|
|
|
Waterfall display for a chime tube supported by a hole in the end cap. Similar to the traditional orchestra chime |
Waterfall display for a chime tube supported at the traditional fundamental frequency node. |
End Cap Support 1/2 inch Type M Copper Tubing |


 End
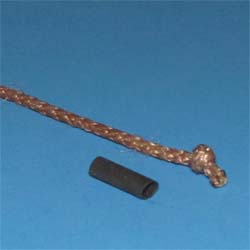
support for Rods: It is possible to support a rod at the
end. You might be tempted to inset a
screw eye at the end, but I can assure you that will completely kill the
resonance. Resonance for a tube or rod can easily be killed by touching the
end. The end cap is a special case that allows resonance to exist without
seriously reducing the sustain time. But adding a screw eye or any amount of
mass to the end can kill the sustain time for a rod. The easy solution that
works very well is to drill a small hole in the end of the rod and epoxy a
50 pound (22 Kg) woven fishing line into the hole. First tie a knot at the end prior to
inserting the line into the hole. This low mass and flexible connection do
not impact the resonance and provides an easy method for connection.
End
support for Rods: It is possible to support a rod at the
end. You might be tempted to inset a
screw eye at the end, but I can assure you that will completely kill the
resonance. Resonance for a tube or rod can easily be killed by touching the
end. The end cap is a special case that allows resonance to exist without
seriously reducing the sustain time. But adding a screw eye or any amount of
mass to the end can kill the sustain time for a rod. The easy solution that
works very well is to drill a small hole in the end of the rod and epoxy a
50 pound (22 Kg) woven fishing line into the hole. First tie a knot at the end prior to
inserting the line into the hole. This low mass and flexible connection do
not impact the resonance and provides an easy method for connection.
 Playground
Chimes Support: Pictured right is a set of playground chimes for a full octave (CDEFGABC)
from anodized aluminum that was displayed on the website
External Works.
Playground
Chimes Support: Pictured right is a set of playground chimes for a full octave (CDEFGABC)
from anodized aluminum that was displayed on the website
External Works.
This fun and easy DIY project has a couple of important requirements.
First, mounting follows the same requirement as above, i.e. locate the support holes 22.4% from both ends. Rubber grommets help to minimize the reduction of sustain time caused by a firm mounting, but are not absolutely necessary for this application.
Rubber has a tendency to deteriorate over time and the use of a nylon or plastic sleeve would be a good alternate.
Firm and strong mounting is definitely a requirement for the playground environment, but we need to prevent squeezing the tube at the mounting location. Careful adjustment, when tightening bolts, can prevent this squeeze.
Keep the mounting somewhat firm to prevent the undesirable BUZZ caused by loose mounting. Flexible grommets allow a firm mounting that will prevent the buzz.
A better arrangement is to insert the the bolt into one side of the chime, no all the way through. This prevents squeezing the chime while maintaining a firm mount to withstand playground play.
Support Line:
Keep the distance between the chimes and the support disk short no matter how they are aligned. This is to assist alignment during high winds. If they dangle too far below to the support disk, they can bump into each other and occasionally get mixed up. A few inches would be best.
Longevity for a chime is important and careful attention to the support lines and thru holes should be considered. Rapid wind changes and UV light can quickly deteriorate support lines, not to mention the many freeze/thaw cycles.
Non metallic support line: Make sure the line is UV resistant. Choices include fishing line (either 80 pound braided or 30-50 pound monofilament), braided nylon line, braided plumb line, braided Dacron kite line, string trimmer/weed eater line (.065 inch), awning cord, and braided electrical conduit pull line.
Metallic support line: thin wire, decorative chain (zinc plated, brass plated, or painted), 1/32 or /16 inch stainless steel cable (rust resistant), small aircraft control line cable.
De-burring: depending on where the support line exits the chime, from the inside or outside, one or the other sharp edges of the thru hole require de-burring. An easy method to de-burr the outside edges of the thru hole is to use a larger drill bit to slightly chamfer the outer edges. If the inside edge of the thru hole is of concern, first remove the burr using a long round file or sandpaper on a stick.
By hand, insert the smooth shaft end of the drill bit or other hardened steel rod into the hole and rotate in a circular motion, careful not to break the drill bit. This motion will tend to further chamfer the outside edge and help to burnish the inner edge of the hole.
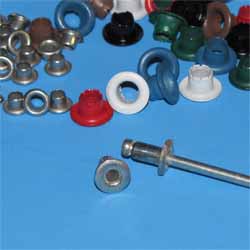
Grommets/Eyelets: are mostly for protecting the outside edge of the thru hole. Rubber, plastic or metal (grommets or eyelets) are encouraged, but small sizes can be a challenge to locate. Small eyelets can often be located at your local hobby store in the sewing department or at shoe repair store. You can also use the outer shell of an 1/8 inch or 3/16 inch aluminum pop rivet. Remove the nail-like center and just use the rivet.
Sources: include Home Depot or Lowes for heat shrink tubing, eyelets from the hobby store in the sewing department or a shoe repair store. Grommets can be from a hardware store, the model airplane store or the hobby store.The knot in the support line or wire can be mostly hidden by use of a countersink hole when using thru holes to anchor the line to the support disk. Pictured below are a few examples for anchoring the line.


 Jigs
to position the chime for
attaching support line or chain:
After you have selected the alignment configuration, top, center or bottom,
a simple jig can assist the installation of the support line. To the right are
three possible jigs, a square-grove jig and a v-grove jig, both with red
adjustable stops for alignment. A third jig made from a section of cardboard
or wood strip can work well. Scribe a mark for the bottom, center, or top
alignment on the jig. Begin with the longest chime and select an appropriate
length for the attachment line from the chime to the support point on the
support disk or ring and locate a nail, a pencil mark, or the adjustable
post at that location on the jig. Place the longest chime on the template
and secure with tape, a clamp or maybe lay a book on it. Stretch the line up
to the reference post and tie a loop or a knot or mark with a felt tip pen.
Repeat with the remainder of the chime set using the scribed reference mark.
For center aligned chimes attach a small section of masking tape to the
center of the chime and scribe the chime center location on the tape.
Jigs
to position the chime for
attaching support line or chain:
After you have selected the alignment configuration, top, center or bottom,
a simple jig can assist the installation of the support line. To the right are
three possible jigs, a square-grove jig and a v-grove jig, both with red
adjustable stops for alignment. A third jig made from a section of cardboard
or wood strip can work well. Scribe a mark for the bottom, center, or top
alignment on the jig. Begin with the longest chime and select an appropriate
length for the attachment line from the chime to the support point on the
support disk or ring and locate a nail, a pencil mark, or the adjustable
post at that location on the jig. Place the longest chime on the template
and secure with tape, a clamp or maybe lay a book on it. Stretch the line up
to the reference post and tie a loop or a knot or mark with a felt tip pen.
Repeat with the remainder of the chime set using the scribed reference mark.
For center aligned chimes attach a small section of masking tape to the
center of the chime and scribe the chime center location on the tape.
|
|||||||||||||||||||||||||||||||||||

Chime-Set Support Ring, Hoop or Disk

 Wind Chime
Support Disk and Striker Patterns
PDF are available in the document to the left. The patterns are for tubing
sizes from �� to 2� in �� increments, and for chime sets for 3, 4, 5, 6, 7, and 8
chimes. Generic layout patterns are also included
Wind Chime
Support Disk and Striker Patterns
PDF are available in the document to the left. The patterns are for tubing
sizes from �� to 2� in �� increments, and for chime sets for 3, 4, 5, 6, 7, and 8
chimes. Generic layout patterns are also included
 Support disk calculator
with points on a circle Calculator included (Zip)
220 Kb
Support disk calculator
with points on a circle Calculator included (Zip)
220 Kb ![]()
You may wish to calculate you own
dimensions for the top support disk using the support disk calculator. You
decide the chime diameter (CD), the striker radius (SR) and the clearance between the striker and the chime
tube
(D). The calculator provides the correct location for placing the chimes on
radius (R) and the spacing between the chimes (C2C), and the
diameter of the support disk (TSDR). Locations (S) are the points
for the support line.
Instructions for use are included with the calculator.

 Also
included is a location calculator for points on a circle. Uses include automatic
calculations for locating chimes on a radius, and points used to draw a
multisided polygon such as a star striker or support disk arranged as a star, a
pentagon, a hexagon or an octagon etc. An easy lookup table is provided for
locating 3 to 8 points.
Also
included is a location calculator for points on a circle. Uses include automatic
calculations for locating chimes on a radius, and points used to draw a
multisided polygon such as a star striker or support disk arranged as a star, a
pentagon, a hexagon or an octagon etc. An easy lookup table is provided for
locating 3 to 8 points.
Rather than using a protractor to layout the angles for the shape of your
polygon, select the number of points and the radius (R) for those points,
and the calculator provides you with the distance between points. Adjust a
compass to the distance (L) and walk the compass around the circle
to locate the points.
If you want to avoid using the above calculator, an easy work-around is to select an appropriate generic pattern from the Support disk and striker patterns document and scribe the accurate location for support holes using the pattern.
|
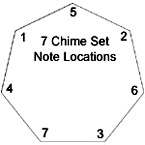
Suggested locations for a circular chime configuration A circular striker will typically strike one chime at a time but can simultaneously strike two chimes. When this happens you can enhance the overall sound by placing widely separated notes next to each other For example, below are location suggestions with chime number 1 as the shortest and moving upwards in length as the location numbers increase. |
|||
|
|
|
|
|
|
Inline configuration |
|||
|
1 - 3 - 5 - 2 - 4 |
1 - 4 - 2 - 5 - 3 - 6 |
1 - 5 - 2 - 6 -3 - 7 - 4 |
1 - 5 - 2 - 6 -3 - 7 - 4 - 8 |


|
|||||||||||||||||||||||||||||||||||


The Wind Chime Striker/Clapper
Orchestra
chimes, of course, need a human to strike the chime and a rawhide-covered rubber
mallet works well. A rawhide-covered baseball or softball can work well for wind
chimes, but only in an extremely high wind environment where there is ample strike
energy from the sail. An orchestra chime is struck with gusto, but a
wind chime often has little strike energy. Typically there is little
strike energy from normal winds so preserving and applying that energy is the
challenge. Design considerations below include single or multiple strikers, the
shape, weight, material, suspension, motion, and strike
location.
An important consideration for a bell-like chime is the
location for the Strike Zone.
 The optimum location is at the very end of the tubular chime because this
location will assure that all possible overtones are energized to the maximum.
This should not be surprising since orchestra chimes are struck at the end.
The optimum location is at the very end of the tubular chime because this
location will assure that all possible overtones are energized to the maximum.
This should not be surprising since orchestra chimes are struck at the end.
An easy solution to assuring the strike occurs at the very end of the chime is to use bottom alignment and a tapered striker as shown in striker suggestions.
Often you will see the center selected as the strike location for a tubular bell wind chime, perhaps for aesthetic reasons. When the exact center of the chime is struck the odd numbered overtones can fail to energize, and the resulting sound can be very clunky even though the even numbered overtones were well energized.
While I recommend striking the end of the chime, there are good aesthetic reasons to align the chimes for a center alignment or a top alignment. The ideal strike zone is about 1 inch from the end, or about an inch below the center, line as pictured below. All three locations work okay when you keep the striker away from dead center, which is a dead zone for the first overtone.
Don't worry much about killing the first overtone with center placement. The first overtone dead zone is very narrow and easily overcome with a slightly off-center strike.
|
Strike zone for top, bottom or center alignment. |
||
 |
|
 |
|
Top Aligned Find the center line for the longest chime and position the striker at least an inch or more below that center line. Anywhere in the green section above. |
Bottom Aligned Find the center line for the shortest chime and position the striker at least an inch or more below that center line. Anywhere in the green section above. |
Center Aligned Find the center line for all chimes and position the striker at least an inch or more below the center line. Anywhere in the green section above. |

The Striker Shape is most often
circular because the chimes are located in circle. An alternate shape is the
circular traveling radial striker which can be effective for striking a musical
chord.
The radial striker most often takes the shape of an open star or a closed star, like the keeper-striker pictured here. The striker has a tendency to rotate CW and CCW as it bounces to and from each chime.
A circular striker will typically contact one or maybe two chimes simultaneously. However, the star shaped striker can synchronously contact most all the chimes. The loudness of the chimes struck with a star striker is somewhat reduced compared to the circular striker because the strike energy has been distributed among the various chimes.
|
|
|


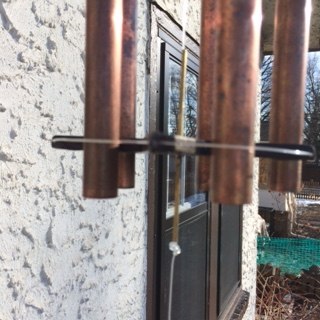
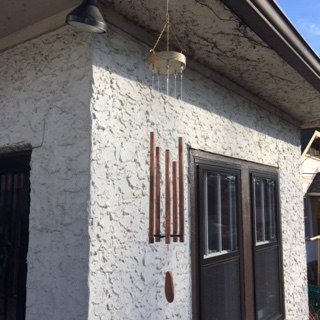
Transparent Closed Star Keeper-Striker: Site visitor and chime set builder, Dennis Wagner, devised a nifty method to gain the advantage of a keeper-striker, yet maintain a clean and transparent look.
Dennis drilled 3/64 inch holes at the star tips and threaded 50# test monofilament fishing line (1/32 inch) thru each hole to form a firm but transparent circular keeper.
Striker Weight: A heavy striker for large chimes and a lighter weight striker for smaller chimes, is mostly true. Depending on your typical wind there may be occasions when you need a light weight striker for large chimes.
Near the seashore, winds can be rather strong and you may need to soften the strike with a light weight striker or switch to a rawhide-covered baseball or softball. Considerable strike energy can be achieved by using an oak disk machined to a knife-edge and loaded with a 1oz weight. See striker suggestions below.
Striker Distance from Chimes: It is difficult to predict the optimum distance from the edge of the striker to the chime for a new design and often requires experimentation. Additional factors effecting overall performance are striker weight, wind sail size, sail weight and average wind conditions in the area.
I generally begin with a 1-inch separation and begin testing. Then maybe change the separation and/or the sail size.
Don't hesitate to abandon your original striker or sail and try a different separation or a different wind sail.
Your effort will be rewarded when you hit that magic combination. Often, I will try about three strikers and two or three sails before finding the perfect combination.
Striker Material:
The choice of material depends somewhat on the note
selection. If there is good movement from the wind sail, then a circular disk
striker (soft sided but heavy) can be used for the larger diameter chimes (say
above 2 inches), particularly for lower frequency
chimes. Some choices are a hockey puck, redwood, red cedar, treated lumber or a
1/4 inch nylon cutting board.
Bullet Nose Edge: If you want a rounded over edge for the circular wood striker and don't have access to a router then you can easily accomplish that task with a drill press or hand drill. Mount the striker in a drill press via a center bolt and then spin it at a high speed to sand it round and round over the edge. You could use a hand drill but it's a little more awkward.
Note: when drilling a center hole in the hockey puck, the drill bit wants to grab and force its way through the rubber and may drill off-center. My experience is to slow down the drill and secure the puck to a surface so it can�t move, then drill very slowly. A drill press woks best but again, secure the puck.
If the wind is quite strong and gusty, you may need to soften the striker even further by using a rawhide-covered baseball/softball. The rawhide helps to produce a very mellow strike in a strong wind. Smaller diameter higher frequency chimes benefit from a harder wood like white oak, teak or Osage-orange aka hedge-apple. Be sure to coat the striker with a UV resistant coating.
On the other hand, a well performing star-striker should be from a relatively hard material, yet light weight, allowing for a quick response to circular movements.
The loudness of chimes struck with a star striker is reduced, compared to the circular striker, because the strike energy has been distributed among the various chimes, and a harder material is required for a strong strike. 1/8 inch soft aluminum, sheet plastic or a 1/4 inch nylon cutting board works well to accomplish both goals.
Keep it Clean: A dirty strike can energize a host of unwanted spurious sideband frequencies as demonstrated by the steel striker in the blue spectrum display below. A most melodious bell sound is achieved with a softer strike that energizes overtones without spurious sidebands, as shown in the purple spectrum display below.
Both strikers produced equal loudness for the fundamental while the steel striker did a better job of energizing overtones (louder) but at the expense of unwanted dirty sidebands. The wood striker (hard maple) produced a most melodious bell sound while the metal strike was harsh and annoying.


 The Conceal and Carry Chime
hides a lead or steel striker on the inside the chime for large diameters chimes, mostly
above two inches as pictured left and right.
The Conceal and Carry Chime
hides a lead or steel striker on the inside the chime for large diameters chimes, mostly
above two inches as pictured left and right.
This technique is seldom used unless the chime set is large or becomes annoying, caused by the traditional disk striker in high winds. Because the distance is insufficient for the striker to gain momentum and strike with gusto, the inside striker could be a good solution to quieting chimes in high winds.
If you're looking for a muted sound from a large set, maybe 4 inches and above, this technique is useful. The striker can be a steel ball or a lead weight, normally used as a sinker for fishing, and can be any of the following: a cannon ball sinker, a bell sinker, a bank sinker or an egg sinker.
Wrap the sinker with about two layers of black electrical tape to prevent the harsh sound from a metal strike yet still provide a strong but muted strike. Support for the striker string or line from can be from the same point you use to support the chime tube.
Striker Motion: I happen to live in
a wooded area with little wind and have
 struggled to achieve good strike energy
from low winds. With that in mind,
I set out to improve the low wind performance of the striker.
struggled to achieve good strike energy
from low winds. With that in mind,
I set out to improve the low wind performance of the striker.
The objective is to maximize striker movement with little input energy from the sail. The easy solution was to resonant the support line that supports both the striker and the sail using the second mode bending principle.
This resonance will help to amplify and sustain the motion of the striker with little input energy from the sail. Even though the sail moves in the wind, it will act as an anchor for the resonant movement of the striker.
You can easily recognize this movement by using both hands to hold a string vertically and have a second person pluck the center of the string. The natural resonance of the string will cause the center to vibrate. If you position the striker at the exact center between the top and the sail you can achieve this resonance.
It is difficult to provide an exact ratio between the weight of the striker and the weight of the sail. Depending on the actual weight for both the ratios can be quite different. In general, when you attempt to resonant the striker line, I suggest the striker not exceed the weight of the sail and ideally the striker should be about 1/2 the weight of the sail.
I realize that if you use a CD as the sail, a lighter weight striker can be difficult to achieve. A heavy striker is difficult to resonant regardless of the weight for the sail.
Once you have a striker you like then a little experimenting with the sail maybe required to achieve good resonance. On the other hand, for medium to high winds and for a non-resonant mounting, the wind catcher/sail should have a weight less than 25% of the striker. When resonance is working well you will notice as the sail comes to rest, the striker will continue to bounce off the chimes for a few more strikes, an indication the striker is dissipating the stored energy from resonance.
See this Resonant Striker VIDEO WMV, for a demo. Notice the large movement of the striker compared with little movement from the sail.
(Best to always include an axle.)
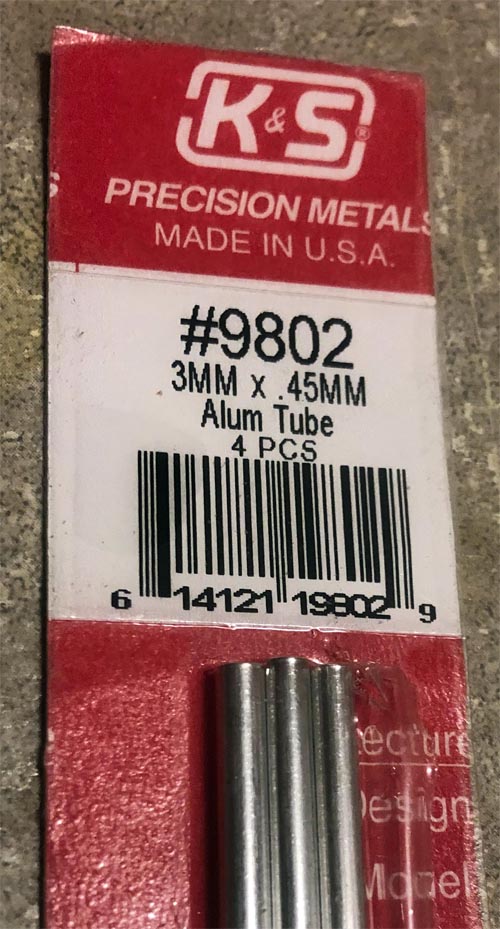 Striker Suspension: A small 1/16-inch brass tube about 5
inches long thru the center of the striker allows for the suspension line to be
threaded and used as an axle for the disk. This helps keep the disk
horizontal during rapid and sudden movements from high winds. A stiff wire, like
coat hanger wire, can be used as an axle as shown below in
striker suggestions. Site visitor Rickey Absher purchased small aluminum
tubing from Amazon. There was sufficient tubing to make four axels. See picture
for details.
Striker Suspension: A small 1/16-inch brass tube about 5
inches long thru the center of the striker allows for the suspension line to be
threaded and used as an axle for the disk. This helps keep the disk
horizontal during rapid and sudden movements from high winds. A stiff wire, like
coat hanger wire, can be used as an axle as shown below in
striker suggestions. Site visitor Rickey Absher purchased small aluminum
tubing from Amazon. There was sufficient tubing to make four axels. See picture
for details.
Thanks to a site visitor who
used lamp repair pipe nipples into a 3/8" hole with lamp hoops
to hold the hanger support and the clapper/striker. The parts are
available in the big box stores and elsewhere. You might consider
using some thread lock to keep them secure. See pictures
A fixed Striker mounted on a
1/4 inch aluminum rod
attached to a solid support
disk is useful in high winds
for a softer strike. Striker Suggestion:
a turnbuckle is often used to support the top support disk and as an axle for
the striker. Over time the turnbuckle can become unscrewed from wind movement.
Place a locking substance on the threads to prevent twisting, such as Loctite or
equivalent.
Striker Suggestion:
a turnbuckle is often used to support the top support disk and as an axle for
the striker. Over time the turnbuckle can become unscrewed from wind movement.
Place a locking substance on the threads to prevent twisting, such as Loctite or
equivalent.
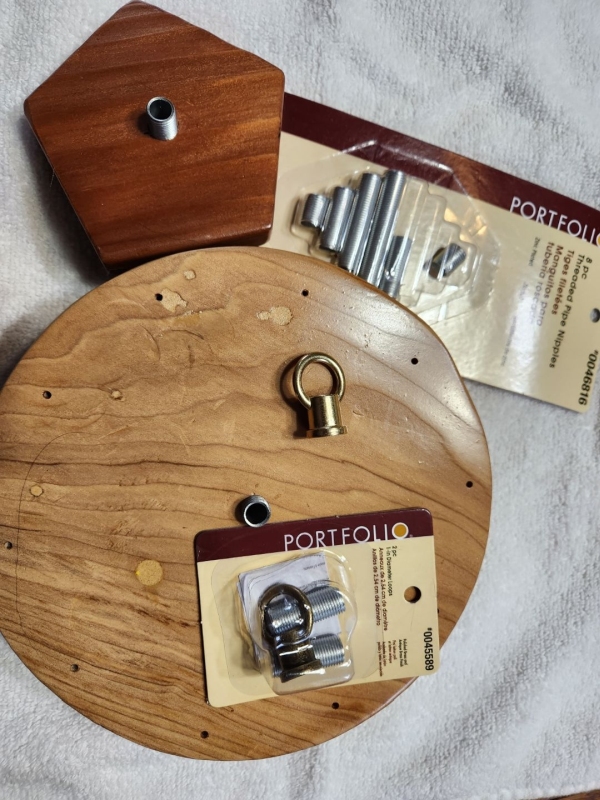
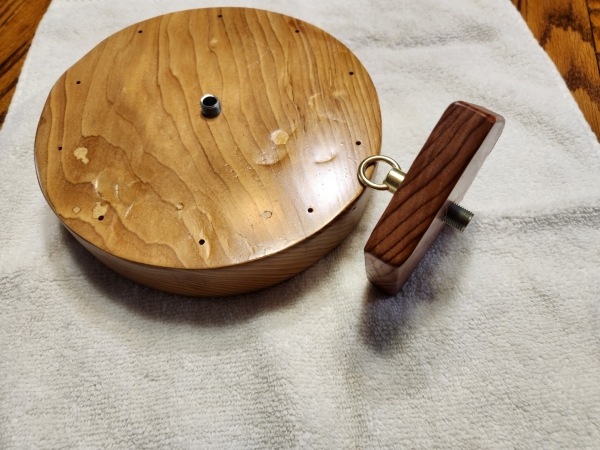
The pessimist complains about
the wind, the optimist expects it to change, the realist adjusts the
sails. by William Arthur Ward.


Bullet nose wood striker with turnbuckle axle maximizes strike energy.
My favorite.
Knife edge wood disk.
Bullet nose wood striker with hollow axle
or wire axle maximizes strike energy.
Knife edge disk striker with weight and
axle.
Close up for tapered edge
wood striker with weight and
axle.


Tapered edge wood striker
with axle allows striking the end of the chime edge for maximum strike
energy.
Typical arrangement for a tapered edge
striker with axle for bottom aligned chimes.
Typical tapered edge striker with axle for
bottom aligned chimes.
A sculptured tapered edge
striker adds a decorative touch for striking the edge of the chime end.
A sculptured tapered edge
striker assures contact with
the very end edge of the
chime.


Animation for a 5-point
open radial striker that rotates on contact with the chime
bouncing back and forth effectively striking a chord or most of
the chord.
The open star radial striker loudness is
reduced compared to the traditional round striker.
The closed star radial striker works great
for maintaining alignment in high wind conditions and produces a more
subtle strike.
The enclosed star radial striker can be
made from 1/8� sheet plastic, aluminum or other light weight but
relative hard material.
Multipliable configurations
exist to achieve a radial
strike. This one might be
appropriate for someone
working in the nuclear
business.


3, 4,and 5 Chime Keeper-Striker.
3-Chime Keeper-Striker.
4-Chime Keeper-Striker.
5-Chime Keeper-Striker.


Enameled coat hanger wire works well for an
axle.
Baseball / Softball good for a mellow
strike in a high wind environment.
Conceal and Carry
The chime carries a concealed lead striker inside a 2 Inch diameter or
larger chime, and provides a unique style with a more subtle strike.
2 oz lead weight wrapped with two layers of
black electrical tape provide a strong but muted strike.
A billiard ball or croquet
ball are choices for a
strong strike on a small
chime. Test first for
harshness. Can be too strong
for some.
The objective of the wind sail/catcher is to cause the striker to randomly contact all the chime tubes. Traditional wind sails work well and can be configured with a variety of materials, sizes and shapes as shown in the document on the right.
Patterns for Wind Sails/Catchers 1.5 Meg, PDF
Dissatisfaction with the traditional wind sails is a single-direction wind has a tendency to cause the sail to swing like a pendulum. That arrangement will swing the sail both to and from the direction of the wind, not allowing the striker to contact adjacent chimes. That affect sounds much like a dingdo as the striker hits only two chimes.
As you may know, wind close to the ground can behave differently than winds aloft, and often does not blow horizontally as intuition would suggest. Instead, it is a multidirectional force with an ample amount of wind shear.
 To
better understand wind turbulence mixed with single-direction winds watch this
60 second video,
To
better understand wind turbulence mixed with single-direction winds watch this
60 second video,
Bi-Directional Wind Vane VIDEO (WMV, 3.2Meg) showing a bi-directional wind vane mounted on my deck. You probably noticed the swirling motion mixed with single-direction winds and the random uphill and downhill movement (pitch and yaw). Perhaps we can exploit this force to make a better wind sail. Let's take advantage of this turbulence to create a striker movement that is somewhat rotational in nature and does a better job of striking all the chimes.
If you want to build a bi-directional
wind vane here is a concept drawing displayed in
3D-PDF.
The metal components are soldered together and the vertical support post is
rounded at the top.
I used thin sheet aluminum for the tail and 1/4 inch copper tubing for the vertical
support sleeve and the horizontal pivoting sleeve. The horizontal rod is 1/4
inch and Gorilla Glue is used to bond the parts not held with solder.
See video here
1.5 Meg WMV
A second solution is to hang the sail perfectly horizontal.
Counter intuitive, I agree, but depending on your particular type of wind it can
work surprising well, particularly if the chime set is hung from a high deck or
beyond the first story of the building and the wind is particularly turbulent.
A fourth solution can be the
radial traveling star striker
described above. The very nature of the star striker is to quickly rotate CW and CCW from any input motion of the sail, even from straight line winds, and this
motion will easily avoid the dingdong sound.
Yes, there is a condition when
excessive pendulum movement of the sail is useful and not sufficiently supplied
by the tradition wind sail. With the development of the keeper-striker or the
radial-striker, both of which are very effective in striking a musical chord,
there is a need for a robust movement of the striker.
The radial striker
produces a more muted sound because the strike energy is simultaneously
distributed among all the chimes by moving in a circular motion. Thus the need
for a more robust strike.
Introducing Orthogonal Sailing: We have developed a special wind sail to solve the need for more
jerk. As mention above, a normal wind sail will mostly swing to and from the
direction of the wind; however, the orthogonal sail has the unique ability to
fly aggressively at right angles to the wind direction. If the wind is from the
North the sail will fly East and West.
Construction details are in the
Handbook and
available here. See the
video below
for the
Orthogonal Wind Sail in action.
We do not recommend
hanging the chime set where the sail can contact children, adults, or
animals. The sail makes no noise and can swing a full 180 degrees in a
half circle motion. This quiet operation and wide swing can cause people
to be unaware of the danger. The sail is flat thin metal and can
possibly cut the skin or damage an eye as it swings.
BE CAREFUL !
Depending on the distance
between the striker and the chime tube, not all chime sets require a sail.
Pictured right are closely spaced chimes that easily contact the striker with
low to moderate winds. Because of the short distance between the striker and the
chime tube, the strike is not robust but adequate.
The best solution for you will depend on your type of wind. You
may need to try a few different sails for success.
 Solving the Dingdong
 The
first of several solutions to better capture wind turbulence can be quite
simple. Mount the sail at 45� to the horizontal so as
to catch the pitch and yaw forces, as pictured on the right. Thread the support
line through two small holes next to the center of an old CD disk and tie the
knot slightly off-center to create the 45� slope. You
may need to glue the line in place for the long term.
The
first of several solutions to better capture wind turbulence can be quite
simple. Mount the sail at 45� to the horizontal so as
to catch the pitch and yaw forces, as pictured on the right. Thread the support
line through two small holes next to the center of an old CD disk and tie the
knot slightly off-center to create the 45� slope. You
may need to glue the line in place for the long term.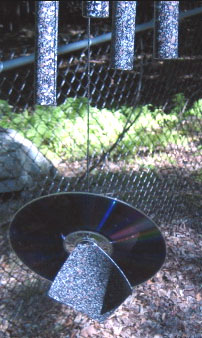 Site
visitor (David) writes to offer an alternate method for tilting the sail. Place
the support line in the hole of the CD and tie to the line an object larger than
the hole such as a shot piece of dowel rod or colorful section of cloth. Now you
have a tilted sail and a sun sail, all-in-one. See picture at left. Thanks
David.
Site
visitor (David) writes to offer an alternate method for tilting the sail. Place
the support line in the hole of the CD and tie to the line an object larger than
the hole such as a shot piece of dowel rod or colorful section of cloth. Now you
have a tilted sail and a sun sail, all-in-one. See picture at left. Thanks
David. A
third solution is to make sure the top support disk can easily rotate in a
circular direction. Hang the top support disk not from a fixed ring or hook but
from a single support line as pictured to the right. The very nature of the wind
will catch enough of the chimes to rotate the entire set allowing the pendulum
motion of the sail to strike more of the chimes. Need More Dingdong?
At
this point you are most likely saying �WHAT� more dingdong? We just got done
solving the dingdong and now you want more!
A
third solution is to make sure the top support disk can easily rotate in a
circular direction. Hang the top support disk not from a fixed ring or hook but
from a single support line as pictured to the right. The very nature of the wind
will catch enough of the chimes to rotate the entire set allowing the pendulum
motion of the sail to strike more of the chimes. Need More Dingdong?
At
this point you are most likely saying �WHAT� more dingdong? We just got done
solving the dingdong and now you want more!
 Jerk, Jolt, Surge and Lurch:
We often describe the motion of an object in terms of displacement, velocity, or
acceleration. However, an additional motion description is the rate
of change of acceleration, although seldom used. The unit of measurement is often termed jerk but is
also known as jolt, surge, or lurch . Jerk supplies the sudden and rapid motion
from the wind sail to the rotary keeper-striker.
Jerk, Jolt, Surge and Lurch:
We often describe the motion of an object in terms of displacement, velocity, or
acceleration. However, an additional motion description is the rate
of change of acceleration, although seldom used. The unit of measurement is often termed jerk but is
also known as jolt, surge, or lurch . Jerk supplies the sudden and rapid motion
from the wind sail to the rotary keeper-striker.
![]()
CAUTION->
The orthogonal sail can be dangerous.
 No Sailing Today:
Long and large diameter chimes present a considerable surface area to the wind
and can move sufficiently to cause a good strike without the need for a wind
sail. In addition, the large diameter striker, often associated with a large
chime set, can capture adequate wind for a good strike.
No Sailing Today:
Long and large diameter chimes present a considerable surface area to the wind
and can move sufficiently to cause a good strike without the need for a wind
sail. In addition, the large diameter striker, often associated with a large
chime set, can capture adequate wind for a good strike.
![]()
Typically named a chaos engine, this arrangement can produce a random movement for the striker. Powered by either 120 VAC or a 12 VDC solar charged battery, the electromagnet is controlled by a circuit board with an adjustable strike rate.
You can design your individual set of windless chimes using components purchased from Roger Sonntag at Sonntag Creations formerly Newton's Flying Magnets. Some of Roger's work is HERE
Below is a short video demonstrating some of the
possibilities.
Contact:
sonntagcreations@gmail.com
Ph: 585-615-4236
 Out of service compressed gas/air cylinders, scuba diving tanks
or fire extinguishers are often cut and used as a chime or bell. Based on
physical measurements can we pre-determine a musical note for these tanks? To
the best of my research I do not find a mathematical method for calculating a
musical note for these tanks. Both the neck-end and the base-end seriously alter
the vibration performance of the cylinder rendering existing formulas useless.
However, once the tank has been cut to your desired length it is
easy work to determine the fundamental frequency using an analysis program like
Audacity�, a free, open
source, cross-platform software for recording and editing sounds.
Out of service compressed gas/air cylinders, scuba diving tanks
or fire extinguishers are often cut and used as a chime or bell. Based on
physical measurements can we pre-determine a musical note for these tanks? To
the best of my research I do not find a mathematical method for calculating a
musical note for these tanks. Both the neck-end and the base-end seriously alter
the vibration performance of the cylinder rendering existing formulas useless.
However, once the tank has been cut to your desired length it is
easy work to determine the fundamental frequency using an analysis program like
Audacity�, a free, open
source, cross-platform software for recording and editing sounds.
 Do not use any formula, table or chart on this
website to
Do not use any formula, table or chart on this
website to predict tanks musical performance. The frequency spectrum does not always follow the traditional overtone pattern for a chime tube and can include a host of additional overtones normally associated with the bell-like sound. See the spectrum diagram to the right. Energizing all the overtones and avoiding the harsh sound when using a metal striker can be a challenge. A golf ball or baseball can work well but requires a robust strike to properly energize the overtones. I have not had good success using a wood striker unless it's a really robust strike not typically possible with a normal wind sail.
 Tank Length Matters or Maybe Not? A most perplexing situation
can exist for some tank lengths. We tested five sets of tank chimes, sets A, B,
C, D, and E pictured to the right. All chimes for sets D and E sounded distinctly
different and each had a different height, and a different fundamental frequency
and overtone structure; however, not true for sets A, B, and C.
In comparison, each chime in set A sounded exactly the same and
had nearly identical fundamental frequencies and nearly identical overtones, but
represented three different lengths. The same was true for sets B and C. There
was a slight difference in timbre among the bells, but a considerable difference in length for each
set.
Tank Length Matters or Maybe Not? A most perplexing situation
can exist for some tank lengths. We tested five sets of tank chimes, sets A, B,
C, D, and E pictured to the right. All chimes for sets D and E sounded distinctly
different and each had a different height, and a different fundamental frequency
and overtone structure; however, not true for sets A, B, and C.
In comparison, each chime in set A sounded exactly the same and
had nearly identical fundamental frequencies and nearly identical overtones, but
represented three different lengths. The same was true for sets B and C. There
was a slight difference in timbre among the bells, but a considerable difference in length for each
set.
 Set B
has both a neck-end and a base-end chime from a compressed-gas cylinder. While
both chimes strike almost exactly the same fundamental frequency (295 Hz vs. 290
Hz), they are of different lengths and have a slightly different timbre but
sound mostly the same. Tank B was more melodious than tank A but not a lot The difference in overtone structure is pictured to the right.
I investigated circular mode resonance which is a function of
just material type, OD and wall thickness, and not length, as a possible
explanation for this effect. Unfortunately the circular mode resonance was
considerably lower than the observed resonance and offered no correlation to the
actual measurements. The calculated vs. observed resonances were as follows:
Calculated circular mode resonance were Set A = 35.4 Hz vs. 133 Hz; Set B= 29.7
Hz vs. 290 Hz; Set C= 71.7 Hz vs. 354 Hz. The formula was provided by
Chuck from
Chuck's Chimes and is: F =
(T/(2*D^2))*SQRT(E/Density) where F = frequency, E = modulus of elasticity, D =
mean diameter, and T = wall thickness.
Set B
has both a neck-end and a base-end chime from a compressed-gas cylinder. While
both chimes strike almost exactly the same fundamental frequency (295 Hz vs. 290
Hz), they are of different lengths and have a slightly different timbre but
sound mostly the same. Tank B was more melodious than tank A but not a lot The difference in overtone structure is pictured to the right.
I investigated circular mode resonance which is a function of
just material type, OD and wall thickness, and not length, as a possible
explanation for this effect. Unfortunately the circular mode resonance was
considerably lower than the observed resonance and offered no correlation to the
actual measurements. The calculated vs. observed resonances were as follows:
Calculated circular mode resonance were Set A = 35.4 Hz vs. 133 Hz; Set B= 29.7
Hz vs. 290 Hz; Set C= 71.7 Hz vs. 354 Hz. The formula was provided by
Chuck from
Chuck's Chimes and is: F =
(T/(2*D^2))*SQRT(E/Density) where F = frequency, E = modulus of elasticity, D =
mean diameter, and T = wall thickness.
I remain a bit perplexed on exactly why length appears to have little effect on the fundamental frequency and the overtones structure above some critical length point. Clearly this was not a rigorous scientific test, but enough to cause concern and points to need for further investigation. Pictured below are a couple of tank chime examples from site visitor Grey Yahn from Pennsylvania.

 If
you're new to cutting metal and looking for an easy method, I use an
abrasive metal cutting saw blade in a radial arm saw and it works equally
well with a cut-off saw, aka chop-saw.
The blade pictured left is under
$5.00 at Home Depot. Make certain to use a cutting disk designed for
the type of metal you plan to use. Using the wrong type of abrasive disk can
cause a dangerous explosion The traditional tubing cutter or hacksaw works well
also. Definitely use safety glasses.
If
you're new to cutting metal and looking for an easy method, I use an
abrasive metal cutting saw blade in a radial arm saw and it works equally
well with a cut-off saw, aka chop-saw.
The blade pictured left is under
$5.00 at Home Depot. Make certain to use a cutting disk designed for
the type of metal you plan to use. Using the wrong type of abrasive disk can
cause a dangerous explosion The traditional tubing cutter or hacksaw works well
also. Definitely use safety glasses.
 Safety
Caution: All these tanks are highly regulated by the US Department
of Transportation (DOT), the National Fire Protection Association (NFPA), by
Transport Canada (TC) and others. Make certain the tank is safe for handling, is
completely empty (fill with water and empty to assure all gases are exhausted),
and is safe for cutting. Wear all recommended safety equipment including eye
protection, hearing protection and respiratory protection. The
tanks are heavy and can be dangerous when handling, use extreme caution.
Decorating the Chime
Safety
Caution: All these tanks are highly regulated by the US Department
of Transportation (DOT), the National Fire Protection Association (NFPA), by
Transport Canada (TC) and others. Make certain the tank is safe for handling, is
completely empty (fill with water and empty to assure all gases are exhausted),
and is safe for cutting. Wear all recommended safety equipment including eye
protection, hearing protection and respiratory protection. The
tanks are heavy and can be dangerous when handling, use extreme caution.
Decorating the Chime
 The chime
tube can be stained, dyed, anodized or painted. A light weight
coating of spray lacquer, spray polyurethane, spray paint, a powder
coat or a crackle/hammered/textured finish (pictured right) can be
used without a noticeable reduction in the sustain time. However,
avoid thick heavy coats of latex as they seriously reduce the
sustain time and can kill the resonance.
The chime
tube can be stained, dyed, anodized or painted. A light weight
coating of spray lacquer, spray polyurethane, spray paint, a powder
coat or a crackle/hammered/textured finish (pictured right) can be
used without a noticeable reduction in the sustain time. However,
avoid thick heavy coats of latex as they seriously reduce the
sustain time and can kill the resonance.


 Patina
finish on steel: Site visitor and artist, Roger Deweese, has
successfully applied a metal dye to produce some amazing patina finishes for his
tank bell chimes.
Read here about the procedure Roger employed.
Patina
finish on steel: Site visitor and artist, Roger Deweese, has
successfully applied a metal dye to produce some amazing patina finishes for his
tank bell chimes.
Read here about the procedure Roger employed.
 Look") The Aged Copper Patina Look
: a site visitor sent me a procedure to artificially age copper to provide
the patina appearance. The procedure works well and pictured to the left are the
satisfactory results. I have included the procedure here for your reference. Be
patient with this procedure , it can take several days to complete but the
results are terrific.
You will need two commonly available chemicals to complete this
process. The first is a rust remover that contains phosphoric acid. A couple of
sources are Naval Jelly� or Rust Killer�. Secondly, a toilet bowl cleaner that
contains either hydrochloric or sulfuric acid. Some choices are Zep� Inc. Toilet
Bowl Cleaner, The Works� Toilet Bowl Cleaner, Misty� Bolex 23 Percent
Hydrochloric Acid Bowl Cleaner and LIME-A-WAY� Toilet Bowl Cleaner. Read the
content labels carefully and look for any brand of rust remover that contains
phosphoric acid and a toilet bowl cleaner that has either hydrochloric or
sulfuric acid in your local store.
The Aged Copper Patina Look
: a site visitor sent me a procedure to artificially age copper to provide
the patina appearance. The procedure works well and pictured to the left are the
satisfactory results. I have included the procedure here for your reference. Be
patient with this procedure , it can take several days to complete but the
results are terrific.
You will need two commonly available chemicals to complete this
process. The first is a rust remover that contains phosphoric acid. A couple of
sources are Naval Jelly� or Rust Killer�. Secondly, a toilet bowl cleaner that
contains either hydrochloric or sulfuric acid. Some choices are Zep� Inc. Toilet
Bowl Cleaner, The Works� Toilet Bowl Cleaner, Misty� Bolex 23 Percent
Hydrochloric Acid Bowl Cleaner and LIME-A-WAY� Toilet Bowl Cleaner. Read the
content labels carefully and look for any brand of rust remover that contains
phosphoric acid and a toilet bowl cleaner that has either hydrochloric or
sulfuric acid in your local store.
|
These are dangerous chemicals. Wear safety glasses, old clothes, rubber gloves and follow all manufactures safety recommendations. If the chemical gets on your skin wash immediately with a liberal amount of water. Use in a well ventilated area. |
Download the patina procedure HERE PDF
- Begin by cutting your chime tubes to length and make any length adjustments necessary for tuning. De-burr and remove any sharp edges from both ends and the support hole.
- Decide how you are going to support the chime, using either end caps or a support line at the 22.42% location. Attach a temporary line to support the chime vertically. This temporary line will get messy and can be discarded at the end of this procedure.
- Clean the chime using a soapy solution of dish washing detergent like Dawn� or equivalent. I also used a fine grade steel wool to lightly scrub the surface. Dry completely.
- Hang the chime vertically.
- Soak a small soft paint brush or dry rag with the rust remover and completely coat the chime. Allow to drip-dry. This could take from a few hours to three days depending on your local humidity. This step slightly etches the surface of the copper in preparation for the next chemical step.
- When the chime is completely dry remove the dried rust remover from the chime using a dry cloth. Do not use water.
Artificial aging copper for the patina appearance
|
|
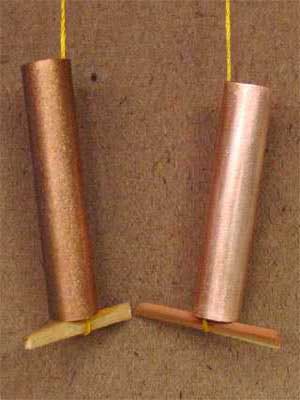
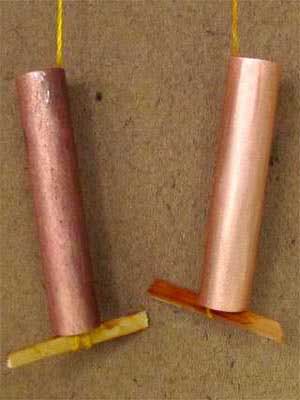
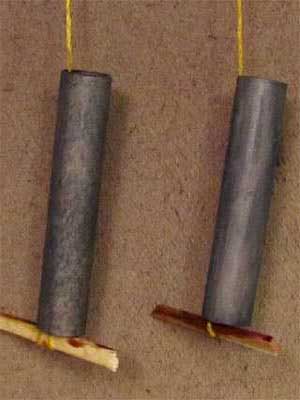
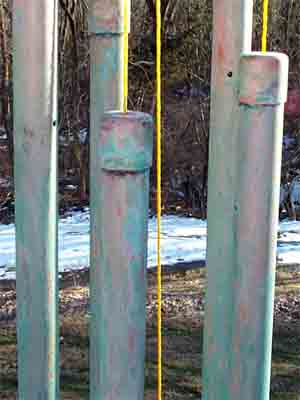
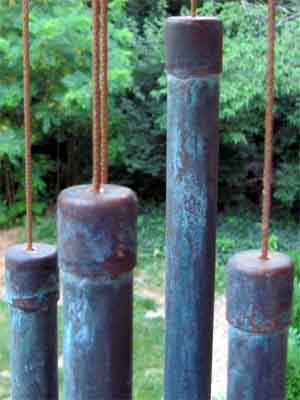
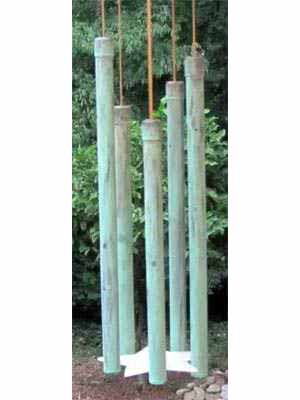
|
The Science of Chiming
What is a Tubular Bell Chime?
Traditional church bells or tubular bells can be characterized by their strike note. That bell-like strike note can be expanded to include the overtone structure, sustain time and loudness. That sounds simple enough, but imbedded in that explanation are two definitions. The first definition is when a chime, properly designed and constructed, can imitate a bell, and the second definition is that a chime may not imitate a bell. Our objectives is to assist you to achieve the most bell-like sound as possible. Compared to a string or brass musical instrument, designing a tubular bell chime presents a unique challenge not experienced elsewhere. Although unique, building a great set of tubular bells can be easily understood and implemented. Ending your project with a successful and pleasing sound is important and setting the right expectations will allow that to happen. The information below may help you to better set realistic expectations.
The second limitation for loudness from a tubular chime depends on the location of the selected note compared to the natural sensitivity of the human ear. You can view the loudness sensitivity range vs. frequency of the ear by viewing the Fletcher/Munson Equal Loudness Curves. The ear has more sensitivity in the range from about 300 Hz to about 4 KHz, than at other frequencies and helps to explain why we can not always hear all the overtones, even if they are present. This loudness limitation will have a direct affect on what notes work best for a chime.
On the other hand, increasing the wall thickness has the opposite effect as an increase in diameter. As the wall thickness increases there is a small decrease in the length requirement for any specific note. In addition there will be an increase in the sustain time from the increased mass. See the graph to the right.
Increasing the outside diameter while keeping the length and wall thickness constant will cause a substantial increase in the resonant frequency.
The sustaining vibration (several seconds) will be the fundamental strike frequency that may or may not be audible. Note selection will be decided by whether you are interested in hearing just the strike note or perhaps more interested in hearing the sustaining note. For example, a chime used in an orchestra setting is typically a rapid sequence of notes with the strike note as the predominate sound, and little if any time is allowed for the sustaining note. On the other hand, a tubular bell wind chime is often characterized by the long sustain time of a note.
Overtones exist and in a perfect metal where the density and the elasticity are constant, have theoretical multiples of the fundamental multiplied by X 2.76, X 5.40, X 8.93, X 13.34, X 18.64 and X 31.87. However, in the real world of metal tubing, when metal does not have a consistent density or elasticity, the multiples will drift from the theoretical values either up or down by as much as +2% to -8% or more. If we could hear the complete compliment of all overtones for each note of a chime tube, it would be a most wonderful bell-like sound. Unfortunately, not all the fundamental tones and/or all the overtones can be adequately radiated as an auditable sound by the chime tube for all possible lengths of a chime. This condition also limits the available range of notes that have a bell-like sound. For example, a chime cut for C2 (65.4 Hz), the fundamental frequency is audibly absent (aka the missing fundamental) along with little audible contribution from the first overtone (180.5 Hz). The remaining overtones combine to produce a perceived musical note. The perceived note does not coincide with any specific overtone and is difficult to measure without a frequency spectrum analyzer or perhaps a good musical ear.
The good news is that the brain processes
the information present in the overtones to calculate the
fundamental frequency, using fuzzy logic. A
The first
characteristic is the sound when the chime is first struck, the Strike Note. It
comprises both the fundamental and the first four overtones, and has that
traditional chime sound for a short period of time.
The 1st overtone contributes for about two seconds and
rapidly deteriorates. The remaining sound is solely the fundamental strike
frequency. Note the long sustain time for the fundamental, pictured to the left
of the photo.
The 2nd, 3rd and 4th overtones are present and contribute to
the strike note but attenuate quickly. They have little contribution to the
lingering perceived sound, aka sustain time or hang-time
In addition to
the many overtones that may be present for a chime, we have the difficulty
of knowing which overtones are prominent for each note, because of the ear's
sensitivity as represented by
The equal loudness curves.
As you might suspect, the loudness of a particular overtone changes as we move
up the scale.
For a typical ear sensitivity range of 300 Hz to 3 KHz, see the
data
audible fundamental and
overtones for wind chime notes as a simple example for the range of audible
overtones. Obviously this is not the entire audible range of the ear, but is
presented as a simple example of the limited ability of the ear to hear all the
frequencies generated by the overtone structure. In particular, the range of C2
to C3 contain a large number of audible overtones while the range of C5 to C7
contains very few.
The note range from C2 thru C4 produce the most melodious
sounds, most bell-like, and are easy to build.
Precise tuning is not required
unless the set is for an orchestra setting.
The set was 1 1/2 inch chrome plated brass with a wall thickness of .0625 inches
and ranged 1� octaves from C5 (523.30 Hz) to G6 (1568.00 Hz). The length of C5
was 62 5/8 inches. The fundamental frequency for this length is around 65 Hz,
about C2# , yet the perceived note is C5 at 523 Hz. The fundamental
strike frequency of 65 Hz and the first overtone at 179.4 Hz (65 x 2.76 = 179.4
Hz) are audibly absent, aka the missing fundamental.
In fact, even the second
overtone at 351 Hz will not be strong in loudness. The remaining overtones
(mechanical vibration modes) combined to produce what the ear hears
acoustically, which is C5 at 523 Hz, yet there is not a specific fundamental or
overtone at that exact frequency.
I spoke with the people at a major USA chime manufacture
(symphony grade) and confirmed that indeed the process of tuning an orchestra
grade chime is a complex process and understandably a closely held trade secret.
The process involves accounting for all frequencies from the fundamental
(whether present or missing) through the many overtones, by the use of
math calculations, acoustic measurements, and the careful grinding of the chime
to achieve the correct length for the desired note.
An orchestra chime is not supported by the classical wind
chime method using a string through the chime at the first frequency node 22.4%,
but instead, is fitted with an end cap that contains a small top hole through
which a steel cable supports the chime.
From testing I find that the end cap not
only enhances the bell-like sound, by increasing the duration of the first
overtone, but it also lowers the fundamental frequency by about 4% to 12 % from
calculated values, depending on tube material and diameter.
More on this at
Chime tube mechanical
support.
Many researchers have spent time investigating the missing
fundamental and the perceived note' from a chime. A few good sources are:
Hyper Physics. Fuzzy logic and the subjective pitch by Dr. John
Askil (no longer available) and
Wikipedia.
Using the above characteristics for a chime, I found a
limited set of notes that will produce a bell-like sound from a tubular chime.
Using the musical scale as a reference, they fall into three categories as
follows:
The 1st chime category
(most bell-like) has a note range from about C2 to the C4 octave. The
fundamental strike frequency is present but audibly absent,
the missing fundamental,
and there are a host of well pronounced overtones.
Often the first overtone can
also be inaudible. The perceived sound is not the fundamental strike frequency
and not the overtones, but an imaginary note created by the combination of the
overtones. To the ear this is a very melodious sound and clearly a bell-like
sounding chime. The larger physical size of this chime for this note range
causes the loudness to be quite adequate, and easily supports radiation for the
many overtones. Note in the spectrum displays below, as we move up the musical
scale the overtone contribution becomes less and less.
The 2nd chime category (almost bell-like) has a note range from about C4
through to about the C6 octave. The fundamental strike frequency is mostly
audible and some overtones contribute to the perceived sound. The perceived note
is not the fundamental strike frequency and not the overtones, but a combination
of both that produce a perceived musical note. The sound can be acceptable but
may not be the sound you are looking for. This has an almost bell-like sound and
can sound fairly good, but not particularly melodious. The loudness is
acceptable but not great.
The
3rd chime category (non bell-like)
has a note range from about C6 through the C8 octave. Not unlike other
percussion instruments this category is characterized by an audible fundamental
strike frequency (a noticeable pure tone) with overtones mostly absent.
Overtones have minimal contribution to the perceived musical note. This note
range may not be particularly pleasing to the ear but should not be ignored as a
pure tone, and is definitely a non-bell sounding chime. In addition, the
loudness is typically low caused by the short length of the chime causing a low
radiating surface for the higher notes. The rapid attenuation of high
frequencies in the environment causes this note range to quickly diminish at a
distance.
I am not aware of calculations for
a tube closed at one end. i.e. a chime with an end cap.
This math is for a tube open at
both ends.
The bending natural frequency for a
tube open at both ends is predicted by Euler's equation where:
w = (B X L)2 x
√
(E X I/(rho X l4))
w - frequency radian per second
- for frequency in cycles per second (Hz), f = w/(2 x π)
w= (B x L)2
x (d/I2) x √
(1/8) x √
(E/density)
(B x L)2 -
Constants based on the boundary conditions for a wind chime (Free-Free Beam)
For a given material then the
frequency of a thin wall tube reduces to:
The reduced formula is: Length (inches) = √(22.42 x K/(2 x π x f)) If you want additional math on the subject here is a paper by Tom Irvine I am convinced that it is not necessary to hand tune a set of bell-like chimes designed for musical notes from fundamental C2 through C4 because the formula achieves the desired frequency well within 1 Hz. Tuning to achieve an accuracy closer than 1 Hz was a waste of time. However, for a fundamental note from C5 and up, good tuning is required. Good physical measurements are important to achieve the calculated accuracy. My favorite design has changed over the years and is currently an end cap supported chime with the striker contacting the tube at the very bottom of the chime using either a tapered striker or a star striker, and having the wind rotate the chime set using a single line support for the support disk. Unfortunately, I know of no formula for calculating the length of a chime tube with an end cap. I begin with a length from standard calculations on this page and then tune by trimming off the length. End caps lower the frequency by as much as 8% to 15%, which requires removal of material to raise the tuning back to the correct vale. Yes, it's a lot of work if you want exact tuning for a tapered end! On occasion I have added an end cap to the calculated value for an open end tube in order to gain a more bell-like sound, but not adjusted the length to regain accurate tuning. For the most part, it has been difficult to acoustically tell the difference between the un-tuned chime set with an end caps and a set of tuned chimes without end caps. Perhaps I have been lucky or maybe the natural shift caused by the end cap is consistent for all five tubes and they remain mostly in tune. Your particular type of wind (single-direction or turbulent) and wind speed will determine the best choice for both the wind sail and for the chime striker. Rotating the chime-set works well to solve the dingdong sound caused from low velocity single directions winds. Another phenomena we observed, but did not have time to investigate, was the simultaneous production of sound from the natural bending mode of the chime coinciding with the resonance of the air column for the tube.
The good news is that another engineer, Chuck at
Chuck's Chimes,
has done an excellent job detailing this effect. I suggest you give
this a look-see. He has excellent information and calculations to accomplish
this special effect.
https://sites.google.com/site/chuckchimes/home
Answer: An excellent question and you read correctly. The chime will produce the C2 note at 65.4 Hz, no problem, but the ear will not hear it? To hear 65.4 Hz we need to move a lot of air, thus the need for woofers used in sound systems. If you place your ear about an inch from the long tube "Surprise" you hear the 65.4 Hz, it�s actually there. But, back up two feet and you won�t hear it.
What you actually hear is a chime note missing both the fundamental (65.4 Hz) and the first overtone (180 Hz). You hear the remaining overtones.
So what to do? You can still make the long tubes cut for the C2 octave. The larger size will enhance the overtones (second overtone, 353 Hz and up) and you will hear lower notes than without using long tubes, but it will not be the actual C2 note. If you happen to have a small public address amplifier and microphone, place the microphone about an inch from the tube. Again C2 is actually there, but it needs amplification to be audible. ^Back to FAQs^
Answer: Yes, with a heavy pipe you need a robust strike
as you suggest. If a hockey puck is inadequate, try a scrap piece of
treated lumber. If that is inadequate try hard maple or oak. Also, the size of
the wind sail is important here. Try different sizes until you achieve the sound
you want.
Answer: No, but you're almost there. The relationship is not
linear so multiplication will not work, but there is an easy way to do this.
Using the calculator enter the type of metal
and the rod outside diameter OD,
one inch steel.
Enter what you know, i.e. 74
3/16 inches or 74.19 and the frequency 32.7 Hz. Repeat this procedure for each note you wish to lower. The same goes for chimes. ^Back to FAQs^
Answer: My all-time favorite to withstand the weather elements is light weight chain. You can use aluminum, brass, stainless steel, or zinc plated steel chain often found in hobby stores and occasional at the local home improvement stores. Depending on the weight of the chime tube (light weight only) my second choice is 80 pound braided fishing line. Make sure to de-burr the support holes smooth. A sources for chain is: FRANK R. FERRIS CO., INC. ^Back to FAQs^
Answer: As long as you have enough to begin at C3, by all means start there. You won�t hear much of C3 but the other notes will be much more melodious and bell like. I often start there or C2, depending on the physical limitations for mounting and the intended application. ^Back to FAQs^
Answer: Only two issues effect the sound from one metal to another, density and elasticity. The density of nickel-silver is 0.31 Lbm / in3 and the elasticity is 18,500,000 psi. You can see from the chart at the right, nickel-sliver is very close to copper. I would suggest using the copper charts for the pre-calculated measurements or use copper in the DIY calculator. The most important measurement is to hang the chime at the 22.4% point. On the data page you can enter the actual density and elasticity to produce an exact calculation. ^Back to FAQs^
09. Question:
Can I mix sizes and metals? Answer: Yes you can mix sizes within a given metal and you can mix metals. Make sure you use the correct chart settings for each size, wall thickness and type of metal. Best to experiment with different metals because some combinations sound wonderful and other not so good. ^Back to FAQs^
As a footnote, my neighbor (a very practical engineer) built a xylophone and did some experimenting with support points for the bars. He did not know bout the 22.4% rule. His choice was 22% from each end because that location provided the best sustain time and the best sound. I completely agree with his findings (22.4%). ^Back to FAQs^
Cost wise I don�t have much experience here. I have seen very reasonably priced anodized aluminum on the internet, nearly the cost of un-anodized. If you�re buying tubing already power coated, as opposed to having it done in a custom shop, I would not expect it to be expensive. ^Back to FAQs^
16. Question:
The hang point is usually close but far from exact on
chimes I have measured.
Should you drill the hang point hole at the
center of the calculated measurement or is the hang point where the string
actually contacts the tube (upper edge of the hole)?
17. Question:
Does the hole size that you drill for the hang point
matter?
18. Question:
Chimes not Chiming!
Answer: Yes, there are several options. You describe a common condition where the sail is either too small or too heavy to supply a good jerk to the striker. Without seeing the set of chimes directly, I suggest you replace the wind sail with something larger and lighter weight. As a test, I use an old CD for a temporary sail, just to make the point that it needs to be light weight and fairly large in size. Often an old CD is not large enough. You can use anything that pleases your eye that meets the size and light weight requirements from your testing.
Also, don't overlook the diameter of the striker. When the distance between the striker and the chime considerably exceeds one inch the chimes may not respond to well to any wind. ^Back to FAQs^
19. Question: Where do I get mounting pins, what size is recommended and how are they held in position?
Answer:
I typically use 1/8 inch brass rod that can be found at my local
hobby store (where a person can buy model airplane parts, model trains, model
cars and the like ) and occasionally at home improvement stores like Home Depot,
Lowe�s, Menards, etc.
Answer: A spot of super glue, hot glue or epoxy will do the trick. A knot also works well. ^Back to FAQs^
21. Question: Is it possible to support a chime in a way that it is fixed, for example with a nail, without losing its tune? Also is it possible to support it so I won't need to drill a hole? I would like to build a music box that uses a chime tube.
Answer: Yes, the chime can be mounted for a fixed support using a number of methods. Any method should locate the support at 22.4% from both ends.
The noninvasive method uses the traditional one wrap string method for supporting an orchestra grade chime or bar, as shown right, courtesy of Woodstock Chimes. Locate the chime above or below the line, either method works equally well.
An invasive and more rugged mount can be from a stud on one or both sides of the mounting location as shown left. A locking nut on the outside of the chime will secure the stud in place and allow attachment to the supporting structure, as often found in playground chimes. I would avoid inserting a bolt through the chime tube, because tightening nuts on both sides can stress the tube causing it not to resonate or reduce the sustain time. ^Back to FAQs^
22. Question:
How do I attach the support line to the support pin
when the pin is down in the tube?
Next, rotate the tube 180 degrees and starting from the other end, feed the line back down the tube, passing the opposite side of the pin. Pull both ends of the line up to the pin from the top end, and tie a slip knot. Pull the knot taught around the pin as shown to the right. You may need to adjust the line to be in the center of the pin using a coat hanger wire or other handy utensil.
It may be difficult to see inside a dark tube. Place a white paper on the floor and hold the tube above the paper as you peer into the tube. This generally allows enough light in to see the location for the line centered on the pin. ^Back to FAQs^
23. Question: I want to use a tapered striker for (6) 2 inch chimes, and the calculated striker size is 3.25 inch radius, would that be the top or the bottom diameter?
Answer: That should be the largest diameter, i.e. bottom diameter if tapered or center diameter if bullet nose. ^Back to FAQs^
24. Question:
Best striker shape and weight for a chime set.
There is a close relationship between a striker�s weight and the ability of the sail to adequately jerk the striker. Because of that relationship, I cannot suggest an exact weight but I do suggest experimentation. I often find myself making two or three strikers before I am satisfied with the overall performance from both the striker and the sail. You could take a scrap of wood and approximate the size and weight of your wind sail and hang it where you intend to place the chimes. Then watch it for a few days to judge its movement.
25. Question: Does the diameter of the support pin affect the chime sound? I am using 2 inch tubing and the brass support rod I am considering is 1/4 inch in diameter, so quite substantial. Trying to use what I have during virus lockdown. Answer: A 2 inch (55mm) tube with a 1/4 inch support rod should be fine. I would not recommend it for a smaller tube like 1 inch OD. Normally I have not used that larger size and prefer 1/8 inch or slightly less. Just make sure it's snug and cannot rattle or work loose. ^Back to FAQs^
26. Question: I saw chimes on a tropical island made from sticks of coral. (worn staghorn coral on the beach, which was there by the millions of tons due to hurricanes.) So I brought back a bunch of sticks of coral. But trying to get maximum wind chime effect is hard, especially on the first try. The coral is much heavier than metal, but it does have a sort of ceramic waterford ring to it. I cannot find any specific plans, but I was leaning towards orienting many of the pieces horizontally for maximum instability and strikes. I also wanted to stay with natural materials and make the top support out of maybe two longer pieces of coral in an X configuration. Answer: My first attempt would be to carefully measure down from each end 22.4% (.224) and tie a monofilament fishing line or perhaps a braided fishing line at those points for support, then test their sound by carefully striking the coral with the sole of a hard rubber shoe. I have no experience with coral chimes but they should follow the basic laws of physics. They will probably need a robust striker because of their small size, depending on how easily they break. Also try a striker with more rigidity, like a plastic plate. ^Back to FAQs^
27. Question:
I use your calculator for calculations but what I don�t understand is when I use
smaller diameter pipes the suggested length is also shorter.
Shouldn�t smaller pipes produce a higher pitch?
In my opinion, the pitch should be going up
when I use smaller pipes, but that doesn�t correspond to your chart. Can you
help me to understand the suggested lengths?
30. Question:
I�m having a little trouble figuring out
what kind of material I�m going to use for my sail.
Any info would be appreciated.
First, drill a small hole at the tips of the star striker and thread small monofilament fishing line around the circle. That will contain each chime in the star.
37. Question:
Can we use bamboo with
the calculator?Answer: No, the calculator will not work for bamboo. It only works for round tubing open at both ends. I have never located a formula for bamboo. You can experiment and probably find notes that sound good and would work well in a set. ^Back to FAQs^
Say It With Chimes is also used as a reference for The Physics Classroom
Woodworking for Mere Mortals A fun site for many projects including an excellent video about using the resources from this site. The Sound of Bells This site has not only informative pages on bell sounds and tuning, but offers free software that lets you listen to the effects of overtones and allows you to tune your bell or chime using a sound card and microphone. Chuck's Chimes Another engineer, Chuck, has an excellent website for chime calculations and information. https://sites.google.com/site/chuckchimes/home * Equations from paper by Tom Irvine Website
Engineering student project by S. Scott Moor, Assistant Professor of Engineering and coordinator of First-Year Engineering at Indiana University, Purdue University � Fort Wayne. The Physics of Musical Instruments by Neville H. Fletcher available at eBay HERE that has a great chapter on chimes and bells.
The missing fundamental effect Fletcher/Munson Curves Fletcher/Munson Curves with ISO
Little did I know what I was getting into when I asked that question. While I would not consider myself an expert by any definition, these findings can be valued for the understanding of tubular bell chimes. My experience with this project has evolved over time and is presented to help you design and build a great set of tubular bell wind chimes. Updates continue almost monthly as development goes forward. HOME | CHIME DESIGN | BIOMASS BRIQUETTING Old Ham Radio Call Books - Cincinnati Triple Steam - Nuclear Aircraft - Emergency Medical
Leland Hite (Lee) K8CLI
|

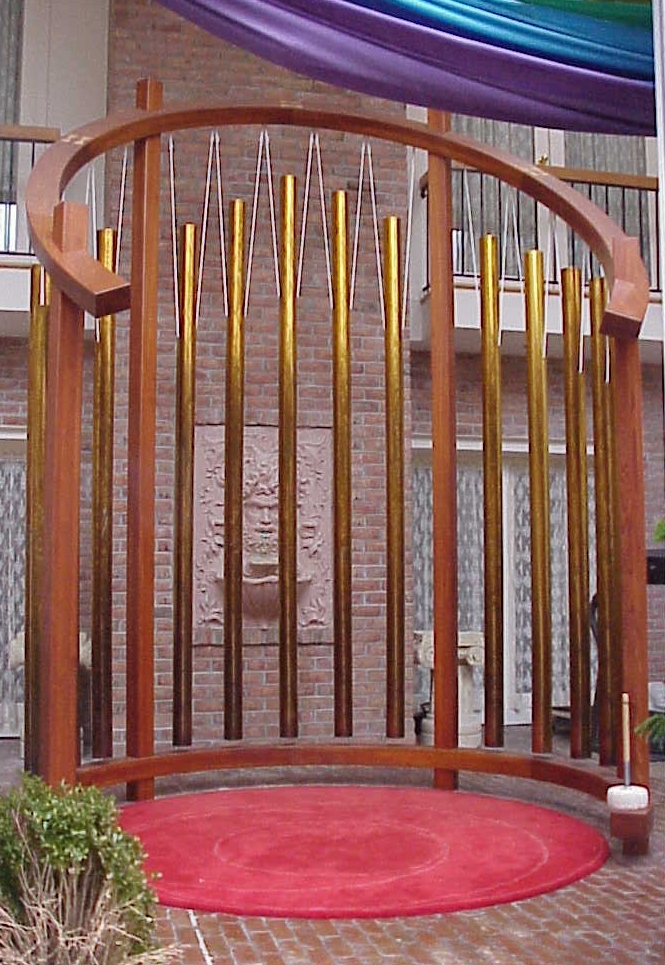


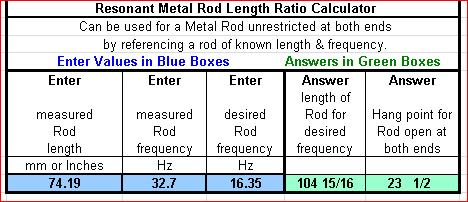 Use
the next tab at the bottom of the page named "Tubing or Rod Length Ratio
Calculator." See chart to the right.
Use
the next tab at the bottom of the page named "Tubing or Rod Length Ratio
Calculator." See chart to the right.

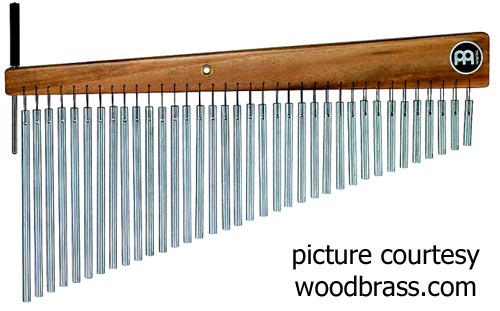
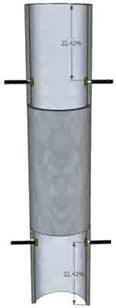
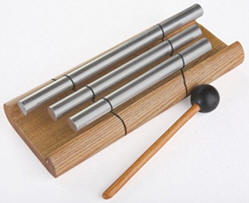

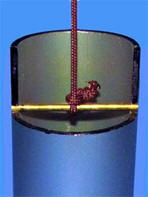 Answer:
Hold the tube horizontal with the support pin also horizontal. Tilt the tube
to be mostly vertical, but not quite. Feed the line down the tube on the bottom
side, passing one side of the pin and out the other end. You may need to attach
a small weight to the end of the line, like a pinch-on fishing line sinker, to
provide sufficient weight so the line will feed all the way through. You can
also blow on the tube or use compressed air to force the line out the other end.
Answer:
Hold the tube horizontal with the support pin also horizontal. Tilt the tube
to be mostly vertical, but not quite. Feed the line down the tube on the bottom
side, passing one side of the pin and out the other end. You may need to attach
a small weight to the end of the line, like a pinch-on fishing line sinker, to
provide sufficient weight so the line will feed all the way through. You can
also blow on the tube or use compressed air to force the line out the other end.
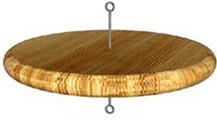 Answer:
My preference is a bullet nose edge for large tubes. Heavy chimes need a
robust strike and a rounded edge striker last longer, and can be simple to
fabricate. Regarding the weight, I would start with a 1.5 inch thick section of
treated lumber, not any thicker, � inch could work.
Answer:
My preference is a bullet nose edge for large tubes. Heavy chimes need a
robust strike and a rounded edge striker last longer, and can be simple to
fabricate. Regarding the weight, I would start with a 1.5 inch thick section of
treated lumber, not any thicker, � inch could work. 
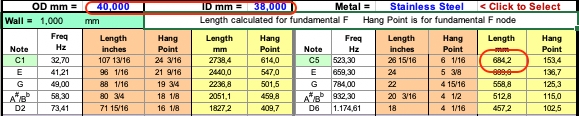

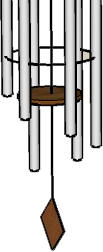 Secondly
drill a tiny hole through each chime at the same horizontal location
from the bottom and thread a monofilament plastic line through each chime all
around all the chimes. See attached picture. You may have to experiment with
various lines to find one that works. Maybe a small weed trimmer line. As you do
this, tie a knot on the outside of each chime to prevent the chime from
slipping along the line. This will keep the chimes evenly spaced and from
separating in high winds, preventing escapement of the striker.
Secondly
drill a tiny hole through each chime at the same horizontal location
from the bottom and thread a monofilament plastic line through each chime all
around all the chimes. See attached picture. You may have to experiment with
various lines to find one that works. Maybe a small weed trimmer line. As you do
this, tie a knot on the outside of each chime to prevent the chime from
slipping along the line. This will keep the chimes evenly spaced and from
separating in high winds, preventing escapement of the striker.